Joined: 08 Jan 2010
Posts: 4
Location: Thessaloniki , Greece PS Version: CS4 OS: Windows 7
Posted: Fri Jan 08, 2010 4:52 am Post subject: Question about a photo.
Hello guys, im new to the forums, happy new year by the way.
Alright, im not a pro photoshopper so please be lenient .
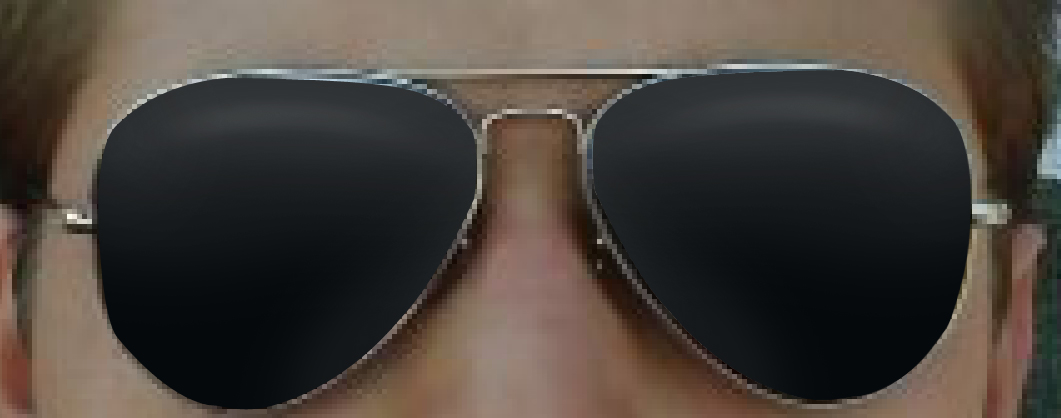
I saw this photo on youtube :
and what i wanna do is what the guy did with his Sunglasses. It looks fake and simultaneously awesome. A friend of mine told me this : He colored them black and then used Burn & Dodge Tool. I tried to do that but unfortunately i failed so i really dunno what to do next. I don't know whether the instructions of my friend were correct so i should try again or something.
Onto the 2nd question, it's relevant to sunglasses but irrelevant to the topic. If you take a photo of yourself using a camera, wearing sunglasses (for e.g. Ray Ban aviator sunglasses which some models reflect), you will see your self reflected on the glasses. How do i make it disappear ? I don't want to add a 2nd layer or something like that. Sorry if i confused you in any way. I'll try to explain it if anyone gets confused.
Joined: 19 Dec 2009
Posts: 277
Location: Oregon, U.S. PS Version: cs OS: windows 7
Posted: Fri Jan 08, 2010 8:26 am Post subject:
The burn and dodge tool can work for this effect largely because you can work with the pre-existing colors. You just have to set the exposure to a very light setting and go easy and gradually. Also, use a larger brush. A small brush will give you harder lines. A layer would be my first choice, but if you're trying to avoid using a layer, I would just recommend using the airbrush at a low setting, then go lightly and gradually build up the highlights.
To remove the reflections in sunglasses, I usually use clipping paths to outline the inside of the lenses. You can then repeat the above steps.
My recommendation is that you use layers, or at the very least, duplicate the background layer. By doing the work on a layer you can use the eraser tool with the airbrush tool to lift out highlights, or areas that may have been sprayed too heavily. Benefit number two: you can adjust the opacity of a layer to also reach the desired effect. Benefit three: if you screw it all up, you can just hide, or delete the layer without destroying your original. _________________ Jeff
Joined: 08 Jan 2010
Posts: 4
Location: Thessaloniki , Greece PS Version: CS4 OS: Windows 7
Posted: Fri Jan 08, 2010 12:04 pm Post subject:
Thanks for answering mate. I got more questions now .
You said, set the exposure to a very light setting. How "very light" are we talking about ?
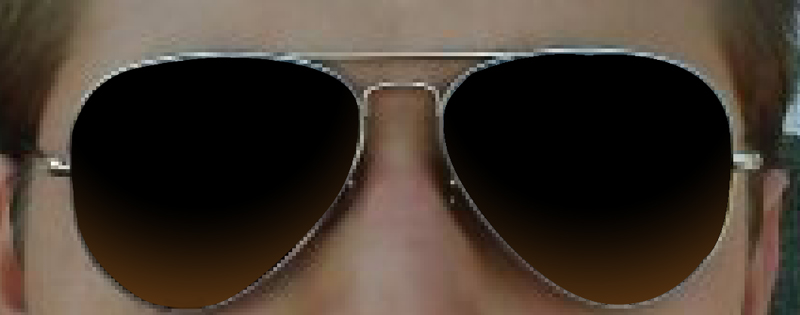
I think im missing it somewhere... Just to make it clear, i have this photo :
and what i wanna do is , firstly, make the glasses look the same as the photo posted above and 2nd of all , i want to remove the reflection because you can see me taking a picture of myself. (My arm & the camera etc..) (it's 2 different tasks)
Another thing, the dodge&burn tools make the image lighter/darker, right ? How will this help me solve my problem. That is why i said before, im missing the point somewhere. There's gotta be more than that, maybe a dodge&burn tool option or something.
Joined: 19 Dec 2009
Posts: 277
Location: Oregon, U.S. PS Version: cs OS: windows 7
Posted: Fri Jan 08, 2010 1:41 pm Post subject:
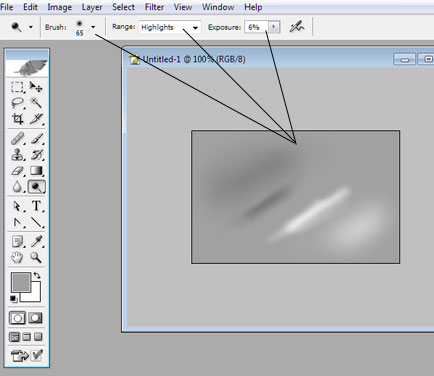
I added a quick example. To answer your questions about the dodge aqnd burn tools: the burn tool only adds severe contrast to whatever tone it is affecting. The dodge tool removes the contrast just as drastically. When I say adjust the exposure, I'm referring to the exposure sliding bar on the top menu. I would say start light at about 6% on the dodge tool and see what type of effect you want. Also, I would recommend using a larger, softer brush.
What I did was use layers.
1. First I made a clipping path to do a rough outline of the left lens. I then airbrushed it with white, using a low brush pressure (6%), and a brush size of 200px.
2. When I got it the way I wanted it, I duplicated the layer, then clicked on the eye icon to hide it. The reason I do this is just in case I ruin it, I have a backup layer.
3. I created yet another layer for the lighter gray highlights at the top. I used a medium soft brush 25 px, with more pressure-50%, held the shift key, then sprayed a straight line.
4. I went to filters, chose "Liquify", then used a large brush 550px, and bent the streak to follow the contour of the lens.
5. From there I merged the two layers-(the gray highlight layers, and the backup lens layer).
6. I then duplicated that merged layer, then flipped it horizontally to create the right side lens.
It was actually a simple job. I hope this helps. [img][/img]
You cannot post new topics in this forum You cannot reply to topics in this forum You cannot edit your posts in this forum You cannot delete your posts in this forum You cannot vote in polls in this forum You cannot attach files in this forum You can download files in this forum