|
|
| Author |
Message |
Jin Kazama
Joined: 07 Mar 2015
Posts: 10
|
 Posted: Sat Mar 07, 2015 11:17 pm Post subject: Help With Removing White Outline! Posted: Sat Mar 07, 2015 11:17 pm Post subject: Help With Removing White Outline! |
 |
|
Ok.I Want to remove white background of a image and already done it.But There Is Still A White Outline.

It Will Only Display If It Is Veiwed In Windows Image Veiwer.
_________________
Power Is Everyting.
-Jin Kazama |
|
|
|
|
 |
dennybeall
Joined: 23 Feb 2015
Posts: 13
Location: Nature Coast of Florida
|
 Posted: Sun Mar 08, 2015 7:56 pm Post subject: Posted: Sun Mar 08, 2015 7:56 pm Post subject: |
 |
|
The file has a transparent background. If you bring it up in PS you can copy it and paste it on top of another file. The white background is just how it's displayed, not the actual picture.
|
|
|
|
|
 |
d^_^b
Joined: 14 Jan 2015
Posts: 194
PS Version: CC 2014
OS: Win 8 64-bit Home / Win 7 64-bit Work
|
 Posted: Mon Mar 09, 2015 4:46 am Post subject: Posted: Mon Mar 09, 2015 4:46 am Post subject: |
 |
|
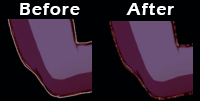
To remove the white outline, select the layer in Photoshop, click the Layer menu > Matting > Defringe. It's not perfect however - see the before and after pic below.
It may be better to go around the image again with the Pen tool and manually deleting the white outline. Or use another rendering method e.g. white background removal action.
http://www.howtogeek.com/59634/remov...toshop-action/
| Description: |
|
| Filesize: |
26.38 KB |
| Viewed: |
615 Time(s) |

|
|
|
|
|
|
 |
d^_^b
Joined: 14 Jan 2015
Posts: 194
PS Version: CC 2014
OS: Win 8 64-bit Home / Win 7 64-bit Work
|
 Posted: Mon Mar 09, 2015 5:14 am Post subject: Posted: Mon Mar 09, 2015 5:14 am Post subject: |
 |
|
Having thought about it, I've outlined a better method below, which I've used before;
01. Open your image in Photoshop
02. Use the keyboard shortcut CTRL SHIFT N to create a new layer and fill it with black so you can better see the white outline
03. CTRL [ to move the black layer down, so your image is on top
04. Hold down CTRL and click the icon of your image in the layers panel, to create a selection around your image
05. Click the Select menu > Modify > Contract and shrink your selection by 1 pixel
06. CTRL SHIFT I or click Select > Inverse
07. Hit Delete on your keyboard a few times.
08. Use the cursor keys to shift your selection around and manually erase if necessary.
You may have contract by more than one pixel, so repeat steps 4-7 as often as necessary.

Final Image

I carried the above out really quickly, but obviously you'd take more care than I did.
Last edited by d^_^b on Thu Mar 12, 2015 7:53 am; edited 7 times in total |
|
|
|
|
 |
Patrick
Administrator

Joined: 14 Feb 2003
Posts: 11945
Location: Harbinger, NC, U.S.A.
|
 Posted: Mon Mar 09, 2015 5:44 pm Post subject: Posted: Mon Mar 09, 2015 5:44 pm Post subject: |
 |
|
|
|
|
|
|
 |
Jin Kazama
Joined: 07 Mar 2015
Posts: 10
|
 Posted: Fri Mar 13, 2015 2:56 am Post subject: Posted: Fri Mar 13, 2015 2:56 am Post subject: |
 |
|
Thanks For All Your Help!

_________________
Power Is Everyting.
-Jin Kazama |
|
|
|
|
 |
|


