|
|
| Author |
Message |
treblmaker
Joined: 27 Mar 2012
Posts: 5
|
 Posted: Tue Mar 27, 2012 8:43 pm Post subject: Text within Work Path (Shape) - Having Issues Posted: Tue Mar 27, 2012 8:43 pm Post subject: Text within Work Path (Shape) - Having Issues |
 |
|
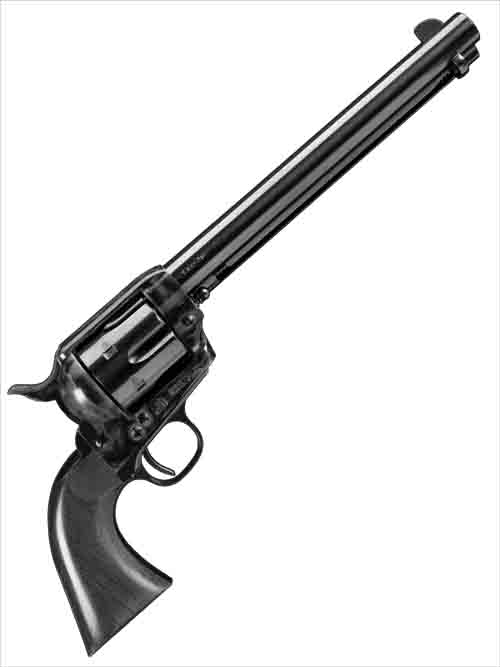
I have a simple image. A side-on view of a revolver pistol on a blank background. I wish to constrain text (in this case, the text of a book chapter) to the negative space surrounding the gun, and including the small bit of negative space around the trigger and within the trigger guard. As it stands, I have been selecting this negative space and converting the selection to a work path, then using the text tool to fill the path. But for some reason that's not working? It just fills the entire canvas with the text. If I click the text tool in the detached bit of negative space (inside the trigger guard and around the trigger), that seems to work just fine, but not for the whole composition. Any ideas? Thanks so much everyone!
| Description: |
| The composition in question |
|
| Filesize: |
186.36 KB |
| Viewed: |
1241 Time(s) |
|
|
|
|
|
|
 |
thehermit
Joined: 05 Mar 2003
Posts: 3987
Location: Cheltenham, UK
|
| Posted: Wed Mar 28, 2012 2:01 am Post subject: |
|
|
Welcome to the forum. I think you may need to draw a path with the Pen tool and then add the text to that path.
Something a little bit like this
_________________
If life serves you lemons, make lemonade! |
|
|
|
|
|
treblmaker
Joined: 27 Mar 2012
Posts: 5
|
| Posted: Wed Mar 28, 2012 1:45 pm Post subject: Figured it out |
|
|
Thanks for the help, Hermit, but that didn't quite get me there.
After some exhaustive googling I managed to figure out what was hampering my efforts. Apparently there can't be any floating selections. For instance, in the case of my gun image, it's just floating in the middle of the field. At least one point of it has to be tangent with the outside edge of the shape functioning as the text constraint. So with my image, I subtracted a 10pt line stretching from the handle to the edge of the composition, connecting it. I hope that makes sense? The gun cannot be completely encapsulated by the surrounding rectangular shape. Same for the inside of the trigger guard; I had to open up a small pathway so that the enclosed area was connected with the rest of the rectangle.
|
|
|
|
|
|
thehermit
Joined: 05 Mar 2003
Posts: 3987
Location: Cheltenham, UK
|
| Posted: Wed Mar 28, 2012 1:47 pm Post subject: |
|
|
You will have to show us the result if you can 
_________________
If life serves you lemons, make lemonade! |
|
|
|
|
|
treblmaker
Joined: 27 Mar 2012
Posts: 5
|
| Posted: Wed Mar 28, 2012 2:33 pm Post subject: semi-finished image |
|
|
| thehermit wrote: | | You will have to show us the result if you can |
Sure thing! Here's a link to the finished poster: http://i41.tinypic.com/15d51js.jpg
The dimensions are 36"x48" so obviously this isn't the full size image, and the font size is about 6.8pts, as I wanted to put the entire text of the book into the poster. The text is "The Gunslinger," the first in The Dark Tower series by Stephen King.
|
|
|
|
|
|
thehermit
Joined: 05 Mar 2003
Posts: 3987
Location: Cheltenham, UK
|
| Posted: Wed Mar 28, 2012 3:00 pm Post subject: |
|
|
Ahh, I see what you were going for now Really nice effect achieved, nice work.
_________________
If life serves you lemons, make lemonade! |
|
|
|
|
|
treblmaker
Joined: 27 Mar 2012
Posts: 5
|
| Posted: Wed Mar 28, 2012 4:04 pm Post subject: |
|
|
| thehermit wrote: | | Ahh, I see what you were going for now Really nice effect achieved, nice work. |
Thank you!
|
|
|
|
|
|
SCTRWD
Joined: 20 Jul 2011
Posts: 79
|
| Posted: Thu Mar 29, 2012 6:56 am Post subject: |
|
|
Actually, you can even get rid of this "pathway". With the help of Direct selection tool select the edge anchor points of one side of the pathway and move them over the other side of the pathway so that the sides "overlap" slightly. This way there won't be no pathway and the result will be perfect. Edit the anchor points so that two sides overlap seamlessly.
|
|
|
|
|
|
treblmaker
Joined: 27 Mar 2012
Posts: 5
|
| Posted: Thu Mar 29, 2012 7:06 am Post subject: |
|
|
| SCTRWD wrote: | | Actually, you can even get rid of this "pathway". With the help of Direct selection tool select the edge anchor points of one side of the pathway and move them over the other side of the pathway so that the sides "overlap" slightly. This way there won't be no pathway and the result will be perfect. Edit the anchor points so that two sides overlap seamlessly. |
Thanks for the tip! I'll have to try that when I get home.
|
|
|
|
|
|
|


