|
|
| Author |
Message |
richsong

Joined: 09 Nov 2004
Posts: 61
|
 Posted: Mon Dec 13, 2004 1:03 pm Post subject: Improving the color of my image Posted: Mon Dec 13, 2004 1:03 pm Post subject: Improving the color of my image |
 |
|
Hi again,
Here I am hat in hand asking for a little help with two gif files. What I would like to do is change the gold color on the round .gif to look more like the gold color on the rectangular one.
I used a gradient fill in the rctangular but I do not remember the settings. I really want the round one to look "shiny" like polished gold.
Any help is appreciated, as usual.
| Description: |
|
| Filesize: |
2.42 KB |
| Viewed: |
970 Time(s) |

|
| Description: |
|
| Filesize: |
19.16 KB |
| Viewed: |
970 Time(s) |

|
|
|
|
|
|
 |
witam

Joined: 27 Oct 2004
Posts: 812
Location: Belgium
|
 Posted: Mon Dec 13, 2004 1:28 pm Post subject: ?? Posted: Mon Dec 13, 2004 1:28 pm Post subject: ?? |
 |
|
|
|
|
|
|
 |
richsong

Joined: 09 Nov 2004
Posts: 61
|
 Posted: Tue Dec 14, 2004 7:46 am Post subject: OK, how did you do it. Posted: Tue Dec 14, 2004 7:46 am Post subject: OK, how did you do it. |
 |
|
Thanks Wittam, it really looks better. I want to try it against a dark background page.
It is not quite what I think I wanted but it is a lot better than it was. I will search around for other effects to see if I can find something closer to what I want for a better example.
The rectangular button looks pretty good as it is against a black background and that is what I am probably going to use on the finished page.
Please tell me how you did it so I can learn to do it myself.
Oh yeah, I just had another thought. How could I change the letters to transparent so that, if I put the gold image on a contrasting background then the background color would show through as the letter colors?
|
|
|
|
|
 |
witam

Joined: 27 Oct 2004
Posts: 812
Location: Belgium
|
 Posted: Tue Dec 14, 2004 12:58 pm Post subject: Posted: Tue Dec 14, 2004 12:58 pm Post subject: |
 |
|
Hey..
Let's see.. i just used curves and fooled around abit untill i got this. It's much trial and error.. Image/adjustments/curves)
The letters.. if you delete them out and then save as gif you can.
Hope this is somewhat helpful..
_________________
Witam
http://members.chello.be/wotsa
http://www.shadowness.com/witam |
|
|
|
|
 |
richsong

Joined: 09 Nov 2004
Posts: 61
|
 Posted: Tue Dec 14, 2004 3:51 pm Post subject: Very helpful! Posted: Tue Dec 14, 2004 3:51 pm Post subject: Very helpful! |
 |
|
Wittam, you are always helpful and your explanations are clear and concise. Thanks again. 
|
|
|
|
|
 |
witam

Joined: 27 Oct 2004
Posts: 812
Location: Belgium
|
 Posted: Tue Dec 14, 2004 4:05 pm Post subject: Posted: Tue Dec 14, 2004 4:05 pm Post subject: |
 |
|
|
|
|
|
|
 |
witam

Joined: 27 Oct 2004
Posts: 812
Location: Belgium
|
 Posted: Fri Dec 17, 2004 11:25 am Post subject: axt Posted: Fri Dec 17, 2004 11:25 am Post subject: axt |
 |
|
Okay.. as asked a bit of an explanation on the axt-files.
This is based on the color range tool (select/color range). This tool will help you select certain areas on your image.
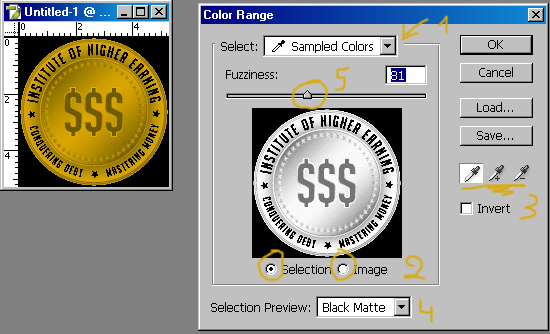
In the first image i put in numbers, i'll explain them here:
1) The box select. You can select certain colors here (greens, yelows,..) or sampled colors. The given colors are the way to select all teh tints from that color. The sampled color will give you the option to select the tint you want to have as selection.
2) In the small preview screen you can two posibilities. Either you see the image or you see what is selected. It depends on the choice you make at number 2.
3) This is how you select your sampled color(s). The first option you use to select one tint that you want selected. However sometimes you want to add another color and thus enlarge your selection, this can be done with the second icon (+). The third with the - will remove a colortint from your selection. You can choose the color on either the preview (small) image in this screen (only if you have in number 2 indicated image) or in your normal big image.
4) Selection preview: this you use to see a preview in your normal (big) image from your selection. There are several options you can use to bring out the selection better.
5) fuzziness: the amount of pixels with related colortints that will also be selected.
If you hit save here, it will save a axt-file, which can only be used here. When you have another image and you load this file again, it will select the same colors as you did here.
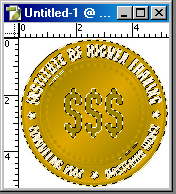
When you hit ok, you agree with the selection you made based on the colors you have chosen, and that is what you will see: a selected area. (see second image, where the striped line indicate the selected area)
Hope this helps..
| Description: |
|
| Filesize: |
104.43 KB |
| Viewed: |
886 Time(s) |

|
| Description: |
|
| Filesize: |
49.04 KB |
| Viewed: |
886 Time(s) |

|
_________________
Witam
http://members.chello.be/wotsa
http://www.shadowness.com/witam |
|
|
|
|
 |
|


