|
|
| Author |
Message |
pixmaker
Joined: 06 Aug 2004
Posts: 1
|
 Posted: Sat Nov 13, 2004 11:27 am Post subject: Adjusting brightness across an image Posted: Sat Nov 13, 2004 11:27 am Post subject: Adjusting brightness across an image |
 |
|
As a photographer, I run into situations in which the light balance across an image is very uneven. I need a way to correct this brightness variation.
This problem isn't complex because the kind of unbalance I'm talking about, for example, is an existing-light pic of a bedroom/living room/whatever, that's illuminated by daylight eentering through, say, a picture window at one end of the room that's not in the image.
In my wet darkroom, it's easy. . . just print down the brighter area and dodge back the darker areas. But, in PS 7, I'm going nuts experimenting with gradients and getting essentially nowhere. Also, digging through the several PS books I own doesn't seem to provide a clue as to where this information is "hidden."
On a few images, the highlights have blown out and I'm aware that there's a significant dynamic range problem here. But I can live with that if I can find a way to simulate "darkroom dodging" in Photoshop.
Since I do a goodly amount of this kind of work, it would be nice to find a way of compensating for these light imbalances in some way other than the "paste ND material over the windows" trick. Any help will be greatly appreciated.
|
|
|
|
|
 |
BryanDowning

Joined: 05 Jul 2004
Posts: 1554
Location: California, USA
|
 Posted: Sat Nov 13, 2004 1:28 pm Post subject: Posted: Sat Nov 13, 2004 1:28 pm Post subject: |
 |
|
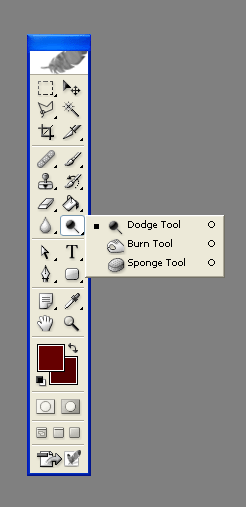
Good news! There just so happens to be a dodging tool in Photoshop. Somebody once explained to me that the reason Photoshop is such an effective program for artists is because all the tools are geared after actual concepts and items. For example the concept of dodging back a photograph.
Anyway, I've attached an image on how to find the dodge tool. Your going to want to select a big fuzzy brush and adjust the settings on the tool options bar to your liking. Mess around with it. I'm sure since you actually do real dodging you be able to find a setting that matches the feeling of doing it in your wet darkroom.
You can also mess around with curves. I'm not too experienced in this feature of Photoshop yet, but apparently it will do just what you want. Curves can be found under Image -> Adjustments -> Curves
| Description: |
|
| Filesize: |
14.53 KB |
| Viewed: |
701 Time(s) |

|
_________________
Best Regards,
Bryan Downing
bryandowning.com |
|
|
|
|
 |
qubert
Joined: 24 Jul 2004
Posts: 253
|
 Posted: Mon Nov 15, 2004 7:18 pm Post subject: Posted: Mon Nov 15, 2004 7:18 pm Post subject: |
 |
|
Or else he could learn how to use ALPHA CHANNELS in Photoshop 7.0. Alpha channels provide greater control in what he is wanting to acheive.
Good luck,
_________________
Qubert |
|
|
|
|
 |
BryanDowning

Joined: 05 Jul 2004
Posts: 1554
Location: California, USA
|
 Posted: Mon Nov 15, 2004 7:22 pm Post subject: Posted: Mon Nov 15, 2004 7:22 pm Post subject: |
 |
|
Well...I don't know anything about channels... 
_________________
Best Regards,
Bryan Downing
bryandowning.com |
|
|
|
|
 |
vel
Joined: 05 Oct 2004
Posts: 339
Location: oc|ca|usa
|
 Posted: Mon Nov 15, 2004 7:47 pm Post subject: Posted: Mon Nov 15, 2004 7:47 pm Post subject: |
 |
|
tisk tisk
haha, neither do i.. they just look cool sumtimes
_________________
postcount++; |
|
|
|
|
 |
teddc

Joined: 04 Oct 2004
Posts: 389
Location: Belmont North Australia
|
 Posted: Tue Nov 16, 2004 2:52 pm Post subject: Posted: Tue Nov 16, 2004 2:52 pm Post subject: |
 |
|
Copy layer <ctrl j> Add adjustment mask (the little circle icon half black, half white)
Use Hue-Saturation. A new layer appears. Click on the white box (mask) and fill it with black.
Use a white foreground colour brush and start to paint over the image part that you want to adjust.
Click onto the box alongside the mask. The Hue-Saturation opens. Adjust the Lightness slider to what ever you need.
Keep painting the parts of image as required. If you make a mistake use a black brush to rectify.
Try this with curves and levels.
The beauty of Adjustment Masks is they are non-destructive. Make a mistake and try again
Ted
|
|
|
|
|
 |
|


