|
|
| Author |
Message |
Shadow123
Joined: 30 Apr 2010
Posts: 3
|
 Posted: Fri Apr 30, 2010 11:21 am Post subject: My WW2 Grey to Color Editing. Posted: Fri Apr 30, 2010 11:21 am Post subject: My WW2 Grey to Color Editing. |
 |
|
I've been working with photoshop for about 6 years now... Just got into this not that long ago
Adolph Hitler Edit:

Russians During WW2
[Before]

[After]

Let me know what you guys think  [/img] [/img]
|
|
|
|
|
 |
thehermit
Joined: 05 Mar 2003
Posts: 3987
Location: Cheltenham, UK
|
| Posted: Fri Apr 30, 2010 11:39 am Post subject: |
|
|
Hi Shadow, welcome to the forum.
It's certainly getting there. Some of the colours, such as Hitler's eyes are over saturated and over worked, just a little too intense, perhaps knocking them back a few shades might add to the realism. Also a few more layers in the individual colours to add depth, the hay and trees and grass would benefit from it. One last thing, I think the soldiers boots should be brown, not black (even though it looks like you may have left the original untouched).
Sorry to be disheartening, as really it's a good effort 
_________________
If life serves you lemons, make lemonade! |
|
|
|
|
|
Shadow123
Joined: 30 Apr 2010
Posts: 3
|
| Posted: Fri Apr 30, 2010 12:01 pm Post subject: |
|
|
yeah the blue eyes was kind of on purpose (hitler wanted germans to have baby blue eyes and blond hair back then xD) but thanks for the advice!
I mainly use
Leveling and Color Balance
|
|
|
|
|
|
thehermit
Joined: 05 Mar 2003
Posts: 3987
Location: Cheltenham, UK
|
| Posted: Wed May 05, 2010 4:40 am Post subject: |
|
|
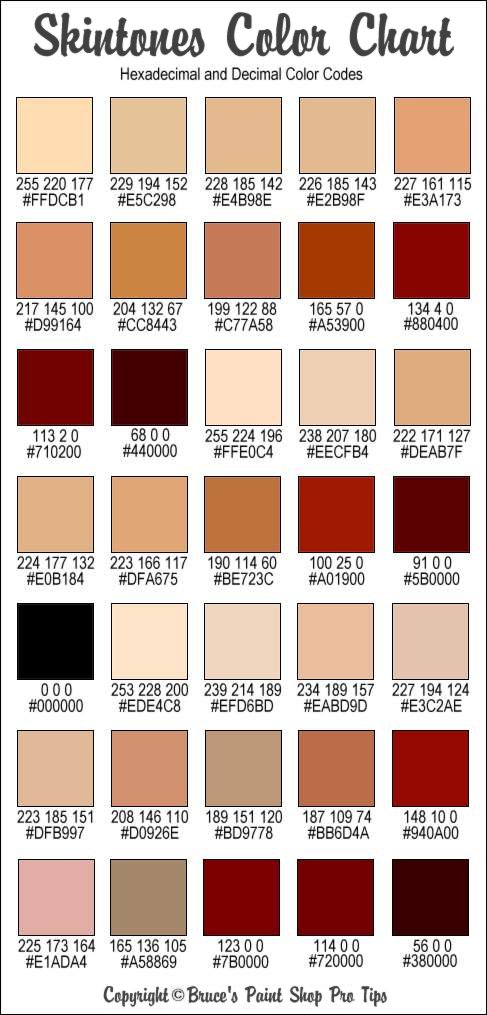
I think you would enjoy trying Gradient Map colouring too, it produces some exceptional results when combined with good masking.
The basics are converting to LAB colour space and then using a custom gradient in Create New Fill or Adjustment Layer>Gradient Map. The technique is great for skin tones and with that end here's a useful skin tone chart to help, make 3 further gradient stops on the Gradient Map and start with a dark tone and work down to lightest tone.
| Description: |
|
| Filesize: |
86.63 KB |
| Viewed: |
445 Time(s) |
|
_________________
If life serves you lemons, make lemonade! |
|
|
|
|
|
|


