|
|
| Author |
Message |
BigJohnny
Joined: 25 Apr 2010
Posts: 9
|
 Posted: Sun Apr 25, 2010 8:54 pm Post subject: How do I fix rough edges? Posted: Sun Apr 25, 2010 8:54 pm Post subject: How do I fix rough edges? |
 |
|
I've been searching around a bit and I can't seem to find an answer to what I'm trying to do.
I have an image that I scanned in, it has some text on it. The text has rough edges, and when I use the magic wand to select the letter the mask also has rough edges.
I would like to take the existing text on the image and basiclly just makes the edges straight. What I was trying to do was to mask it with the magic wand, and then make the mask edges straight, then I could just paint the edges on either side of the mask to fix the rough text and make it clean again.
Well, I'm not very good with photoshop and I can't seem to figure this out, I've followed some tutorials on youtube and such, but my results are never the same, and they don't seem to quite apply to what I want to do.
So can anyone please guide me on how to fix the images rough edges so I can make the existing font/text look crisp and clean again?
The image is black background with white text..... I would think it would be simple but I guess I'm just not that smart. :\
|
|
|
|
|
 |
cynnie
Joined: 25 Apr 2010
Posts: 5
|
| Posted: Mon Apr 26, 2010 1:10 am Post subject: |
|
|
I'm having a hard time picturing what you want to do. If you attach the image i can do it, then tell you how i did it.
|
|
|
|
|
|
BigJohnny
Joined: 25 Apr 2010
Posts: 9
|
| Posted: Mon Apr 26, 2010 6:06 am Post subject: |
|
|
Here it is. if you look at the text on it (AUTO, LO, HI ETC) you can see it's all rough.
I want to clean up existing font on the image and make the edges smooth and crisp.
I do NOT want a replacement font, this is Automotive and there are people who want an OEM reproduction, meaning no substitute font or something close.
I appreciate your help, thank you.
Sorry the image is too big to post here.
HERE is a link to it zipped up on my personal webhost.
|
|
|
|
|
|
cynnie
Joined: 25 Apr 2010
Posts: 5
|
| Posted: Mon Apr 26, 2010 8:31 am Post subject: |
|
|
Wow i don't know how that got so distorted, but the text has completely lost its integrity. You can use the magic wand and then use the "refine edge" option to improve the selection, but its not going to be any where near perfect. The only way to get this perfect is to get ahold of the original text, or to draw the letters out manually with the pen tool which is very tedious and time consuming.
|
|
|
|
|
|
BigJohnny
Joined: 25 Apr 2010
Posts: 9
|
| Posted: Mon Apr 26, 2010 9:07 am Post subject: |
|
|
It's silkscreened on a sheet of acetate or something. it's clear with black on the front and white on the back for the fonts. the material is slightly textured, so during scanning it has likely been distorted by the texture.
I have an illustrator file that someone put the image into, and they have it drawn out with live paint, but I can't even begin to figure out how to use illustrator so I gave up.
maybe I could cut the text from the illustrator file and put it in the photoshop file??
|
|
|
|
|
|
cynnie
Joined: 25 Apr 2010
Posts: 5
|
| Posted: Mon Apr 26, 2010 9:38 am Post subject: |
|
|
You should be able to export the file to photoshop.
|
|
|
|
|
|
thehermit
Joined: 05 Mar 2003
Posts: 3987
Location: Cheltenham, UK
|
|
|
|
|
|
hawkeye
Joined: 14 May 2009
Posts: 2377
Location: Mesa, Az
OS: Windows 7 Pro 64 bit
|
| Posted: Mon Apr 26, 2010 10:29 am Post subject: |
|
|
If you're looking for a quick fix, I don't think you'll find one. What I did here is to blow it up to 200% then use the pen tool to trace the outlines of the letters and then fill the path with red.
I did this pretty fast so it's not perfect, and if I were to actually try this I'd suggest using a vextor mask for each letter to get it right.
| Description: |
|
| Filesize: |
13.17 KB |
| Viewed: |
8678 Time(s) |

|
|
|
|
|
|
|
BigJohnny
Joined: 25 Apr 2010
Posts: 9
|
| Posted: Mon Apr 26, 2010 11:22 am Post subject: |
|
|
I haven't quite figured out the vector masking and the other options available for it. Whenever I have something selected, and add a layer mask or vector mask etc, everything but the mask disappears and I don't really know how to use the tools apparently.
I'll check out that font, it might be a good enough substitute.
|
|
|
|
|
|
hawkeye
Joined: 14 May 2009
Posts: 2377
Location: Mesa, Az
OS: Windows 7 Pro 64 bit
|
| Posted: Mon Apr 26, 2010 11:46 am Post subject: |
|
|
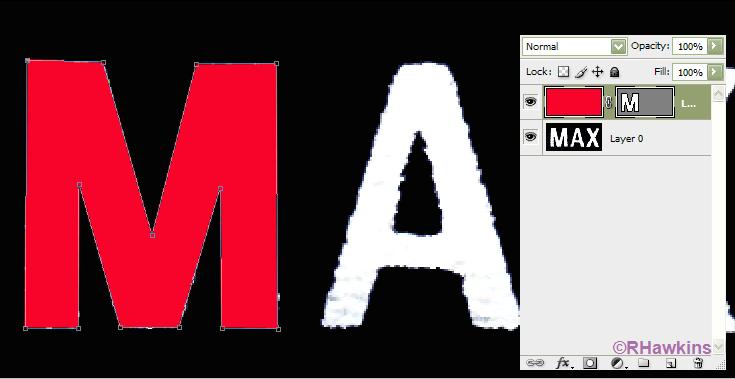
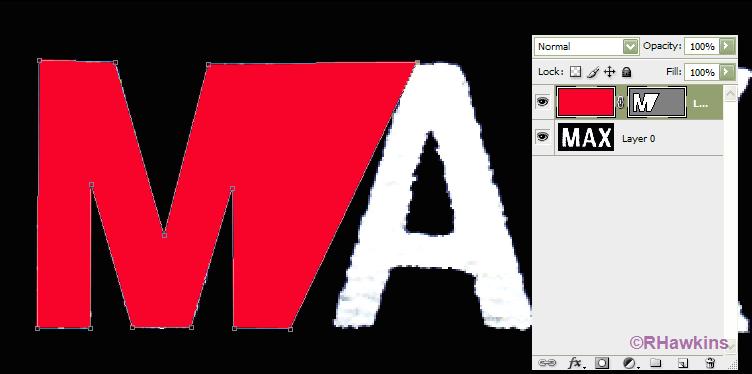
Add a new layer and fill it with any color you like (you can change it later to white). Now add a hide all vector mask to this layer.
Use the pen tool on the new layer vector mask to create a path around the letter. (Lower the opacity of the layer so you can see through to the letter below) As you draw the path the color will be revealed.
Adjust the path as needed. The beauty of the vector mask is that you alter the path after the fact. (as I did in screenshot 2). Note how the vector mask looks in the screenshots.
| Description: |
|
| Filesize: |
27.56 KB |
| Viewed: |
8670 Time(s) |
|
| Description: |
|
| Filesize: |
27.31 KB |
| Viewed: |
8670 Time(s) |
|
|
|
|
|
|
|
|