|
|
| Author |
Message |
MrMagenta
Joined: 25 Dec 2009
Posts: 6
|
 Posted: Fri Dec 25, 2009 6:42 am Post subject: Fade out circle? Posted: Fri Dec 25, 2009 6:42 am Post subject: Fade out circle? |
 |
|
How do I fade out a circle so that it starts with full opacity but the more along the circle you travel, the less opacity becomes. Preferably I would like to be able to set the end point where ever I choose, not necessarily opacity=0 exactly just before the circle starts.
I've tried feather and fade-out on a new layer, but of course it will not fade along the circle but more like a fade out across the circle.
Also, I noticed that Outer Glow doesn't fade out as well with feather, only the circle line itself with Outer Glow continuing as if the line existed. How do I fade out the Outer Glow as well? I can't do it on a new layer with fade out since I have many layers and those beneath will be influenced by the new-layer-fade-out. I would only like to manipulate the circle layer and its Outer Glow, nothing else.
Difficult?
|
|
|
|
|
 |
hawkeye
Joined: 14 May 2009
Posts: 2377
Location: Mesa, Az
OS: Windows 7 Pro 64 bit
|
 Posted: Fri Dec 25, 2009 9:51 am Post subject: Posted: Fri Dec 25, 2009 9:51 am Post subject: |
 |
|
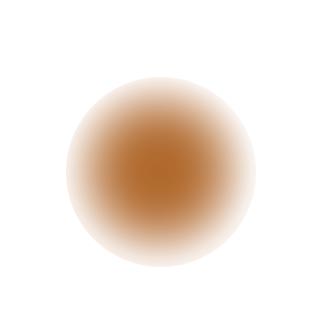
Unless I misunderstand what you want to do, the radial gradient should work.
| Description: |
|
| Filesize: |
10.75 KB |
| Viewed: |
9892 Time(s) |
|
|
|
|
|
|
 |
MrMagenta
Joined: 25 Dec 2009
Posts: 6
|
 Posted: Fri Dec 25, 2009 12:30 pm Post subject: thanks, but... Posted: Fri Dec 25, 2009 12:30 pm Post subject: thanks, but... |
 |
|
Thanks, but I did not mean from the center to the edges. I meant a circle, not a filled one. I made it by drawing a circle and then using the stroke function.
I actually found a choice in PS where I first made a thin circle line with the help of stroke, then selected it and inversed it (so that the circle was selected) and then choose the "Fill Gradient Radial" (or similair, up at the top left in PS after having chosen gradient fill.)
The only problem is that I can't control the radial fill. Where I want to stop it for example, it goes all the way to the end.
Also, when I add Outer Glow it does not fade out as the circle itself does. How to control that?
|
|
|
|
|
 |
hawkeye
Joined: 14 May 2009
Posts: 2377
Location: Mesa, Az
OS: Windows 7 Pro 64 bit
|
 Posted: Fri Dec 25, 2009 12:58 pm Post subject: Posted: Fri Dec 25, 2009 12:58 pm Post subject: |
 |
|
I'm still not exactly 100% sure what you're trying to do but... Start the radial gradient in the middle of the circle and drag it to the edge of the circle. After you use the radial gradient on a layer mask and get it close to what you want, unlink the mask from the image (click the lock icon between the mask and layer) then you can use the move tool and transform on it. That may help to control it better.
For the layer style, with that layer highlighted in the palette click: Layer-Layer Style-Create Layer. That will put the outer glow on it's own layer, so it can be manipulated independently.
Hope this helps.
|
|
|
|
|
 |
MrMagenta
Joined: 25 Dec 2009
Posts: 6
|
 Posted: Sun Dec 27, 2009 8:34 am Post subject: Posted: Sun Dec 27, 2009 8:34 am Post subject: |
 |
|
Good thing to know regarding separating effects and layer, thanx.
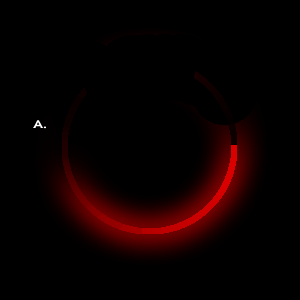
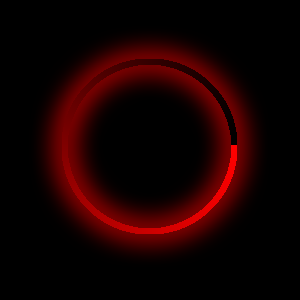
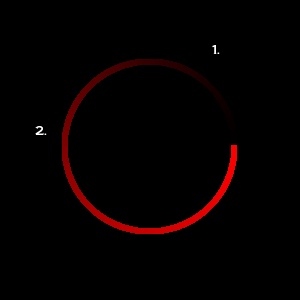
I have attached three pictures. The only problem now is that I would like to control it somewhat more precise and quicker, without having to "hand-adjust" it so much with feather and so on. The reason is that I plan to make a lot of these so I need a quicker and more precise method. Is that possible?
Read the pictures from down to up, they appear in the wrong order.
| Description: |
| This is pretty much the final result I'm looking for, but it took a lot of fine-tuning like feather, eraser etc. Possible to do it more controlled and faster? |
|
| Filesize: |
16.14 KB |
| Viewed: |
9863 Time(s) |
|
| Description: |
| The Outer Glow follows all the way out, I'd like to fade it out earlier separately. |
|
| Filesize: |
24.29 KB |
| Viewed: |
9863 Time(s) |
|
| Description: |
| This was my first try. But now the line disappears somewhere at point 1 automatically. I would like to control where to fade out the line, for example at 2. |
|
| Filesize: |
3.92 KB |
| Viewed: |
9863 Time(s) |
|
|
|
|
|
|
 |
Icy
Joined: 25 Dec 2009
Posts: 24
|
 Posted: Sun Dec 27, 2009 9:09 am Post subject: Posted: Sun Dec 27, 2009 9:09 am Post subject: |
 |
|
I might just say something whole wrong, but I'm guessing.
First you make a ball, with a gradient.
Then you make another black ball or whatever colour your backround is, but make the second one a bit smaller so it can fit in there.
|
|
|
|
|
 |
artd
Joined: 06 Sep 2009
Posts: 51
|
 Posted: Sun Dec 27, 2009 1:44 pm Post subject: Posted: Sun Dec 27, 2009 1:44 pm Post subject: |
 |
|
Hi MrMagenta,
I gave this a try and attached my result. Let me know if that's what you're trying to do. I added a yellow outer glow to this one as an experiment :-) To a certain degree, I can control how much of the ring gets faded out. As far as where the starting point is, you could simply rotate the entire ring after creating it. If you're looking for something pretty fast, this one took less than a minute.
Art
| Description: |
|
| Filesize: |
24.89 KB |
| Viewed: |
9852 Time(s) |

|
|
|
|
|
|
 |
MrMagenta
Joined: 25 Dec 2009
Posts: 6
|
 Posted: Wed Dec 30, 2009 9:13 am Post subject: Posted: Wed Dec 30, 2009 9:13 am Post subject: |
 |
|
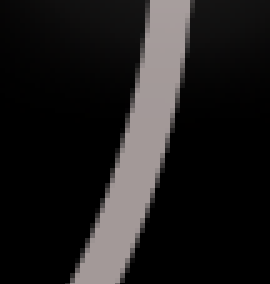
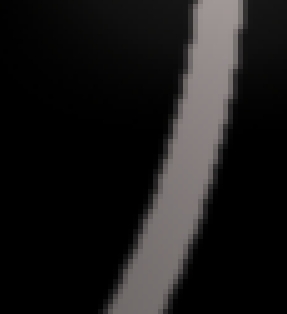
Thanks. I've also managed to make that circle and control where to end it. Now there's only one problem left. If I use "stroke", the line becomes anti-aliased in a very good way, if I use "feather", it's not equally as good.
The difference might look small, but the "stroke" way of doing it makes the line a little more sharper.
I have two examples below. The stroke option makes the line more smoother, is there any way to do that without using stroke?
The stroke-option creates a circle which I have to fade out manually, but if I select the circle, then use a feather of 0,6 and a radial gradient fill, the circle will fade out by itself. Since it's faster to use feather I would prefer that option, but the circle isn't as good anti-aliased as when I use stroke.
Is there any other way to anti-alias without using feather?
| Description: |
| This is the stroke option. The gradients from grey to black are more in numbers. |
|
| Filesize: |
8.88 KB |
| Viewed: |
9835 Time(s) |
|
| Description: |
| This with the feather option. You see that there are less gradients. |
|
| Filesize: |
14.36 KB |
| Viewed: |
9835 Time(s) |
|
|
|
|
|
|
 |
MrMagenta
Joined: 25 Dec 2009
Posts: 6
|
 Posted: Wed Dec 30, 2009 9:48 am Post subject: Solved! Posted: Wed Dec 30, 2009 9:48 am Post subject: Solved! |
 |
|
The above issue has now been solved. I'm not really sure how though, I think it's because I've chosen "anti-alias" in the fill bucket.
Thank you for your contributions.
|
|
|
|
|
 |
MrMagenta
Joined: 25 Dec 2009
Posts: 6
|
 Posted: Wed Dec 30, 2009 10:11 am Post subject: Posted: Wed Dec 30, 2009 10:11 am Post subject: |
 |
|
Just to clarify: When I use the magic wand tool (to mark the circle I've already created with anti-aliased stroke), I make sure that anti-alias is chosen. When I then use the radial gradient filler the half circle that is created will be anti-aliased.
Done deal.
|
|
|
|
|
 |
|


