|
|
| Author |
Message |
Google
Joined: 12 Jun 2009
Posts: 22
Location: California
PS Version: HP/Toshiba
OS: Windows XP/Vista
|
 Posted: Sat Jun 13, 2009 1:21 pm Post subject: Posted: Sat Jun 13, 2009 1:21 pm Post subject: |
 |
|
Like i said, do you have your logo already? if you do just copy and paste it
_________________
<a><img></a> |
|
|
|
|
 |
hawkeye
Joined: 14 May 2009
Posts: 2377
Location: Mesa, Az
OS: Windows 7 Pro 64 bit
|
 Posted: Sat Jun 13, 2009 1:41 pm Post subject: Posted: Sat Jun 13, 2009 1:41 pm Post subject: |
 |
|
I'd suggest looking again at the tutorial idad gave you, then add the final step of saving the file. If you have more than one layer do not flatten the file. If you have a solid color background layer trash it before saving the file. Simply save it as a png file, this will preserve the transparency.
When you want to use it on another picture, open the png file and using the move tool, drag it onto the other image. It will be in it's own layer and can be positioned anywhere you like.
|
|
|
|
|
 |
magnumrush

Joined: 06 Jun 2009
Posts: 10
Location: Plano
|
 Posted: Sat Jun 13, 2009 4:50 pm Post subject: Posted: Sat Jun 13, 2009 4:50 pm Post subject: |
 |
|
| Google wrote: | | Like i said, do you have your logo already? if you do just copy and paste it |
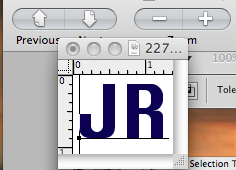
Okay, Google. I suspect you still don't understand me. I added my logo to the left. The background is transparent. Try pasting it on a jpg photo that is all black background. It disappears.
_________________
No, Mr. Bond. I expect you to die. |
|
|
|
|
 |
iDad
Joined: 22 Feb 2009
Posts: 767
OS: iMac 24" 1TB harddrive OS10.5.6
|
 Posted: Sat Jun 13, 2009 4:54 pm Post subject: Posted: Sat Jun 13, 2009 4:54 pm Post subject: |
 |
|
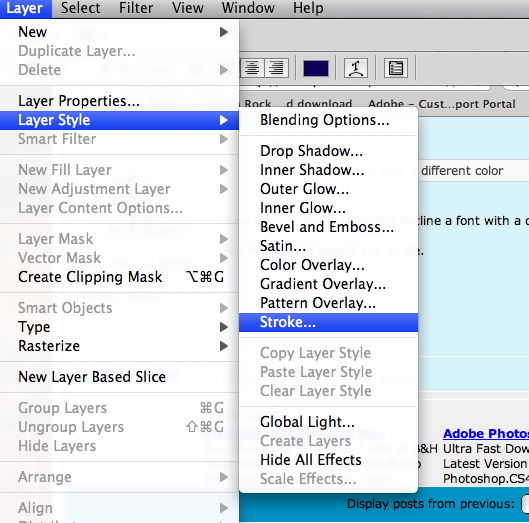
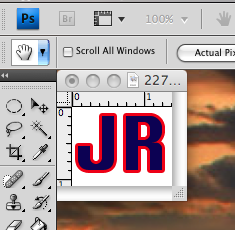
outline your fonts with a different color
|
|
|
|
|
 |
iDad
Joined: 22 Feb 2009
Posts: 767
OS: iMac 24" 1TB harddrive OS10.5.6
|
 Posted: Sat Jun 13, 2009 4:55 pm Post subject: Posted: Sat Jun 13, 2009 4:55 pm Post subject: |
 |
|
0r bevel and emboss it
|
|
|
|
|
 |
magnumrush

Joined: 06 Jun 2009
Posts: 10
Location: Plano
|
 Posted: Sat Jun 13, 2009 6:38 pm Post subject: Posted: Sat Jun 13, 2009 6:38 pm Post subject: |
 |
|
| iDad wrote: | | outline your fonts with a different color |
Now you're talking. How do I outline a font with a different color?
_________________
No, Mr. Bond. I expect you to die. |
|
|
|
|
 |
iDad
Joined: 22 Feb 2009
Posts: 767
OS: iMac 24" 1TB harddrive OS10.5.6
|
 Posted: Sat Jun 13, 2009 6:46 pm Post subject: Posted: Sat Jun 13, 2009 6:46 pm Post subject: |
 |
|
it's very easy folow this attachments
| Description: |
|
| Filesize: |
20.22 KB |
| Viewed: |
285 Time(s) |

|
| Description: |
|
| Filesize: |
145.67 KB |
| Viewed: |
285 Time(s) |

|
| Description: |
|
| Filesize: |
39.96 KB |
| Viewed: |
285 Time(s) |

|
|
|
|
|
|
 |
magnumrush

Joined: 06 Jun 2009
Posts: 10
Location: Plano
|
 Posted: Sat Jun 13, 2009 7:34 pm Post subject: Posted: Sat Jun 13, 2009 7:34 pm Post subject: |
 |
|
Awesome. I'll give it a shot.
_________________
No, Mr. Bond. I expect you to die. |
|
|
|
|
 |
iDad
Joined: 22 Feb 2009
Posts: 767
OS: iMac 24" 1TB harddrive OS10.5.6
|
 Posted: Sat Jun 13, 2009 7:37 pm Post subject: Posted: Sat Jun 13, 2009 7:37 pm Post subject: |
 |
|
If your having a problem I'd be happy to help. PM me,if you need a hand with it.
|
|
|
|
|
 |
salvadore
Joined: 07 May 2009
Posts: 144
Location: Tennessee
PS Version: CS5.5
OS: OS 10.5.6
|
 Posted: Sun Jun 14, 2009 10:46 am Post subject: Posted: Sun Jun 14, 2009 10:46 am Post subject: |
 |
|
One way to do this would be to create your text, and then a new layer with a shape, or image or whatever, then with the text below the shape, select the shape layer, and go to "Layer/Create Clipping Mask" this will allow you to fill text with another image.
If this is not working, you can make a shape, create the text, "Command or Control" click the text layer to make an outline of the text, then delete these pixels from your shape,
Or you can add drop shadows or inner shadows to make the logo stand out, also you can put a stroke on the text
_________________
For great Photoshop tutorials and freebies, check out www.iammrknowitall.com |
|
|
|
|
 |
|


