|
|
| Author |
Message |
panohintz
Joined: 05 Oct 2005
Posts: 3
Location: MI
|
 Posted: Wed Oct 05, 2005 5:59 am Post subject: Replacing Background Posted: Wed Oct 05, 2005 5:59 am Post subject: Replacing Background |
 |
|
I have 2 panoramic images - different exposures. The first photo has a good sky; but the body of the photo is dark. In the second photo, the body is good, but the sky is washed out. How can I add the sky from the first photo to the second photo wihout disturbing the trees, leaves, etc.
|
|
|
|
|
 |
lasa

Joined: 08 Aug 2005
Posts: 1090
Location: Florida
PS Version: CS
OS: MS XP
|
 Posted: Wed Oct 05, 2005 11:52 am Post subject: Posted: Wed Oct 05, 2005 11:52 am Post subject: |
 |
|
Can you post the pictures? it really depends on if sky is seen through the trees and leaves...You might be better of saturating the washed out picture or a zillion othe option beside out right surgey.
Lasa
|
|
|
|
|
 |
panohintz
Joined: 05 Oct 2005
Posts: 3
Location: MI
|
 Posted: Thu Oct 06, 2005 8:25 am Post subject: Images Posted: Thu Oct 06, 2005 8:25 am Post subject: Images |
 |
|
Sure - although the dark one has a car in it. I'm wondering if it would just be easier to add a sky to the better image. Any thoughts?
|
|
|
|
|
 |
swanseamale47
Joined: 23 Nov 2004
Posts: 1478
Location: Swansea UK
|
 Posted: Thu Oct 06, 2005 9:58 am Post subject: Posted: Thu Oct 06, 2005 9:58 am Post subject: |
 |
|
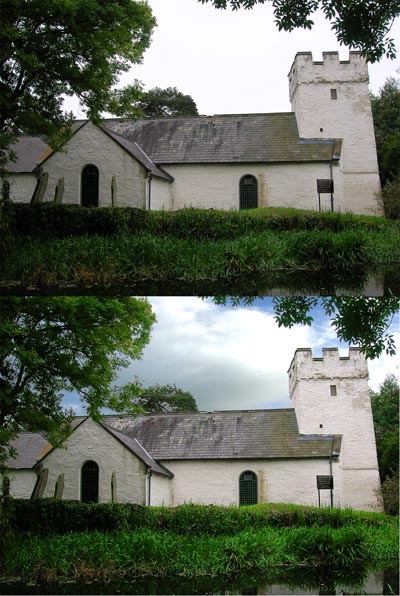
Adding a sky is pretty easy really. Double click on the background layer to unlock it (click ok when the box pops up) next is to select the sky, sometimes the magic wand will work, sometimes you will have to use the lasso, when you have the sky selected hit delete, this should leave a check pattern where the sky was (don't worry thats normal) then find a suitable sky and using the move tool drag it onto your background (it will cover it) now on the layers palette drag the sky below the background and your done.
See pic Wayne (the bottom one had a levels and hue/sat ajustment as well)
| Description: |
|
| Filesize: |
91.23 KB |
| Viewed: |
571 Time(s) |

|
|
|
|
|
|
 |
panohintz
Joined: 05 Oct 2005
Posts: 3
Location: MI
|
 Posted: Thu Oct 06, 2005 5:48 pm Post subject: Posted: Thu Oct 06, 2005 5:48 pm Post subject: |
 |
|
As an "extreme" newbie there seems to be some steps missing, but I appreciate the advice and will give it a try. Thank you.
|
|
|
|
|
 |
~Lakai~
Joined: 07 Oct 2005
Posts: 16
Location: Terrace, BC, Canada
|
 Posted: Fri Oct 07, 2005 1:00 am Post subject: Posted: Fri Oct 07, 2005 1:00 am Post subject: |
 |
|
I just learned this and would feel great deep down inside to be able to show you how to do it, but without me going into a great ammount of detail to make it completely newbie friendly, I'd say the same thing as swans  If you need one of us to be more specific though, just post again and one of us will race back to the topic If you need one of us to be more specific though, just post again and one of us will race back to the topic 
_________________
Ubertron sig 5000
( Until you guys whip me into shape =D ) |
|
|
|
|
 |
swanseamale47
Joined: 23 Nov 2004
Posts: 1478
Location: Swansea UK
|
 Posted: Fri Oct 07, 2005 9:29 am Post subject: Posted: Fri Oct 07, 2005 9:29 am Post subject: |
 |
|
My reply has all the steps needed, if in the shortned version, I wasn't aware you were new to PS, to discribe all the fine details like ajusting the sky to fit if it's the wrong size, would take some time.
For my church photo I double clicked the small pic on the layers palette, and clicked ok to the pop up box (that unlocks the layer) I next selected the magic wand tool, set the tolerance to 30 and clicked in the sky (in my image this selected it all) then I hit delete, hey presto! old sky gone. Next I opened my sky image and using the move tool dragged it on top of the church then using the move tool click the small sky pic on the layers palette and drag it below the church. At this point you could resize the sky if needed, mine didn't as it was shot on the same camera and setting, but I'd use the free transform to up or down size if it was needed.
Hope that helps a little.
If you post your pic we'll be better able to advise on the best way to change it Wayne
|
|
|
|
|
 |
|


