|
|
| Author |
Message |
roach
Joined: 12 Aug 2005
Posts: 11
Location: Houstn,Tx.
|
 Posted: Fri Aug 12, 2005 10:42 pm Post subject: Image to linear Posted: Fri Aug 12, 2005 10:42 pm Post subject: Image to linear |
 |
|
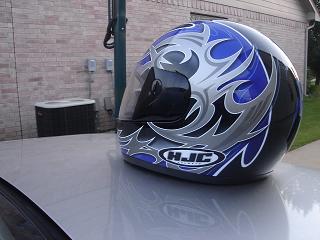
I have a photo of a motorcycle helmet. My thing is i just want to make it all lines so I can drop my own color in some areas how can i achieve this. How can I upload photos on here a good hosting site. THANKS "A newb"
|
|
|
|
|
 |
Gallo_Pinto

Joined: 15 Jul 2005
Posts: 785
Location: BC, Canada
|
 Posted: Sat Aug 13, 2005 12:04 am Post subject: Posted: Sat Aug 13, 2005 12:04 am Post subject: |
 |
|
just downsize the photo so it'll fit and ad it as an attachment. As for lines, I'm not entirely sure what you mean. You can use filter > stylize > find edges, then desaturate the colour, and then turn the contrast all the way up to make a hasty sort of line art, which you can then fill with whatever colour you like
_________________
brush your hair and comb your teeth |
|
|
|
|
 |
roach
Joined: 12 Aug 2005
Posts: 11
Location: Houstn,Tx.
|
 Posted: Sat Aug 13, 2005 12:23 am Post subject: Posted: Sat Aug 13, 2005 12:23 am Post subject: |
 |
|
thanks just what i was looking for now how do i select the parts were i want color it a very graphical helmet lots of lines
|
|
|
|
|
 |
Gallo_Pinto

Joined: 15 Jul 2005
Posts: 785
Location: BC, Canada
|
 Posted: Sat Aug 13, 2005 12:30 am Post subject: Posted: Sat Aug 13, 2005 12:30 am Post subject: |
 |
|
well, the magic wand tool is second from the top, in the right column of the tools. Just click in the area you want to colour. The tolerance option refers to what colour difference it will select. A higher number will select a wider range of colours. if the tolerence is too low, you may see see a very thin white line around your coloured blocks (very ugly). if you want to minimize thw black lines, go to select > modify > expand.
Personally I would colour on a background layer and blend out the white on the upper layer. I'll explain better next post.. brb
_________________
brush your hair and comb your teeth |
|
|
|
|
 |
roach
Joined: 12 Aug 2005
Posts: 11
Location: Houstn,Tx.
|
 Posted: Sat Aug 13, 2005 12:38 am Post subject: Thanks Posted: Sat Aug 13, 2005 12:38 am Post subject: Thanks |
 |
|
This might help try to post a picture. is there a way that I could use flash or some how put it as a vector and that way drop colors in it cause the wond is a little crazy
| Description: |
| C:Documents and SettingsLance FreitagMy DocumentsCustomer WorkDSC01167sm.JPG |
|
| Filesize: |
31.04 KB |
| Viewed: |
607 Time(s) |

|
|
|
|
|
|
 |
Gallo_Pinto

Joined: 15 Jul 2005
Posts: 785
Location: BC, Canada
|
 Posted: Sat Aug 13, 2005 12:39 am Post subject: Posted: Sat Aug 13, 2005 12:39 am Post subject: |
 |
|
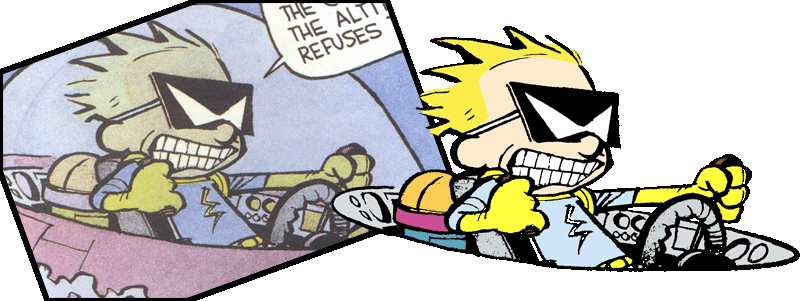
okay, here's a before-after-recoloring pic, of one I whipped up from a scanend comic strip. Here's what I did to get it to look good:
1- select the black outlines with the magic wand.
2- on a new layer, fill this with black.
3- the original pic is now no longer needed, I deleted it and made a new blank background
4- use magic wand to select an are I want to colour. Selct>modify>expand to make the selection big enough that it half-overlaps the black outline.
5- fill on the lower layer.
6- repeat for each different colour
This absolutely ensures that no annoying white lines will crop up, and if I do say so myself it looks pretty nice.
| Description: |
|
| Filesize: |
104.54 KB |
| Viewed: |
602 Time(s) |

|
_________________
brush your hair and comb your teeth |
|
|
|
|
 |
Gallo_Pinto

Joined: 15 Jul 2005
Posts: 785
Location: BC, Canada
|
 Posted: Sat Aug 13, 2005 12:40 am Post subject: Posted: Sat Aug 13, 2005 12:40 am Post subject: |
 |
|
egad!!! I've just noticed I forgot the yellow bolt of lightning on his chest!!
I don;'t use flash ( as a general rule I despise it with every bone in my body) but I mnow you can vector-ize stuff with it. beyond that, I can't give any flash help
_________________
brush your hair and comb your teeth |
|
|
|
|
 |
lasa

Joined: 08 Aug 2005
Posts: 1090
Location: Florida
PS Version: CS
OS: MS XP
|
 Posted: Sat Aug 13, 2005 7:02 am Post subject: Posted: Sat Aug 13, 2005 7:02 am Post subject: |
 |
|
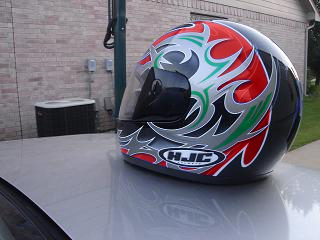
The helmet has a zillion grades of blue and grey so it get tricky.
The sure 100% fool proof way is to mask out each color put it on its own layer and color it..with that said do you want to put in the time...maybe maybe not
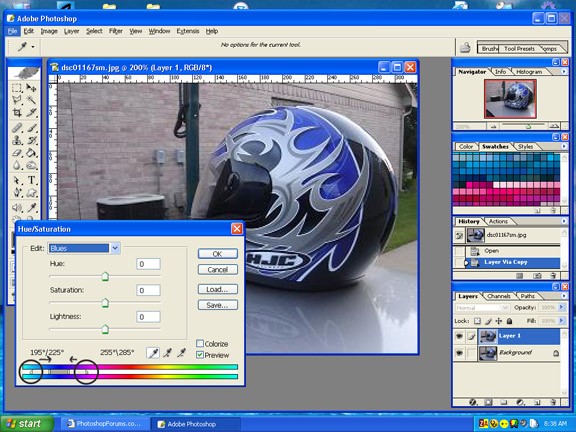
You can also try the Hue/Satuation tool..
chose blue from the edit..and click on the blue for starters.
now at the bottom of the pop up you'll see two rainbow strips.
The grey area between the strips is the main range of blue picked.
The little triangles on either side are the range included.
if you move the triangles in you ristrict the colors to be effected...narrow the spectrum.
Now you can move the HUE slider around...
Good luck, alot of neutral greys..
Lasa
| Description: |
|
| Filesize: |
99.15 KB |
| Viewed: |
589 Time(s) |

|
| Description: |
|
| Filesize: |
47.08 KB |
| Viewed: |
589 Time(s) |

|
|
|
|
|
|
 |
roach
Joined: 12 Aug 2005
Posts: 11
Location: Houstn,Tx.
|
 Posted: Sat Aug 13, 2005 3:14 pm Post subject: Thanks Posted: Sat Aug 13, 2005 3:14 pm Post subject: Thanks |
 |
|
Thanks for all the help all of it worked in some way. One more question I just got so frustrated i just drew the helmet my self and all the lines with no color though now if i scan it how can I start dropping colors were I want them and I do have flash too. And on the hue/saturation tool how in your example that you did how did you achieve to get the green in that one area. Thanks alot big help!!!!
|
|
|
|
|
 |
lasa

Joined: 08 Aug 2005
Posts: 1090
Location: Florida
PS Version: CS
OS: MS XP
|
 Posted: Sat Aug 13, 2005 3:45 pm Post subject: Posted: Sat Aug 13, 2005 3:45 pm Post subject: |
 |
|
Glad you were able to do what you wanted even if it took drawing the little beast..Green was masked using the mask tool. The color was way to neutral to mess with. Did you free hand it or pentool? Pentool though it can be a pain in the butt is wonderful for that kind of detail...and makes it a breeze to paint later.
Lasa
|
|
|
|
|
 |
|


