|
|
| Author |
Message |
Winterchase
Joined: 11 Oct 2011
Posts: 4
Location: Hiawassee Georgia
|
 Posted: Tue Oct 11, 2011 2:07 pm Post subject: Layering in a brass ball Posted: Tue Oct 11, 2011 2:07 pm Post subject: Layering in a brass ball |
 |
|
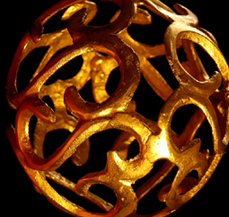
I'm wanting to add something inside this brass ball. Maybe Earth, or a pretty woman, something. I'm new at this and have tried everything I can think of but.... I have Corel "Knockout," if that'll be any help, which I've used on several photographs.
| Description: |
|
| Filesize: |
88.51 KB |
| Viewed: |
601 Time(s) |
|
|
|
|
|
|
 |
Auieos
Joined: 29 Jan 2010
Posts: 2019
|
| Posted: Wed Oct 12, 2011 1:56 am Post subject: |
|
|
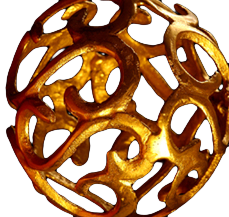
Not sure about the corel programs. In Photoshop they have a color selection command available in the selections menu.
Here is a transparent version of your picture. You will still need to remove the back side of the ball to make it appear as if something was inside of it.
| Description: |
|
| Filesize: |
98.62 KB |
| Viewed: |
592 Time(s) |
|
|
|
|
|
|
|
Winterchase
Joined: 11 Oct 2011
Posts: 4
Location: Hiawassee Georgia
|
| Posted: Wed Oct 12, 2011 3:10 am Post subject: Brass Ball |
|
|
| Auieos wrote: | Not sure about the corel programs. In Photoshop they have a color selection command available in the selections menu.
Here is a transparent version of your picture. You will still need to remove the back side of the ball to make it appear as if something was inside of it. |
TKS. The only solution I've come up with is to erase the front parts of the ball that are over the "Earth," which is a second layer. It's not a very exact way of doing it.
I'll check out your tip on the color selection command. "Magic Wand" leaves a thin black (in this case) border and ragged edges. "Knockout" doesn't do that. And it's so exact it'll even leave wisps of hair. I started out shooting portraits of friends against a green screen but with "Knockout," that isn't necessary. I could have saved a pile of $ had I known.
|
|
|
|
|
|
Auieos
Joined: 29 Jan 2010
Posts: 2019
|
| Posted: Thu Oct 13, 2011 10:55 pm Post subject: |
|
|
Yeah that knockout looks good. Pretty sure there is some fancy tool in cs5 a bit similar.
if you Google 'cs5 masking tools' you get a lot of helpful videos and sites.
I'm probably living in the past with some of my methods.
|
|
|
|
|
|
hqdung
Joined: 14 Oct 2011
Posts: 3
|
| Posted: Fri Oct 14, 2011 9:21 am Post subject: |
|
|
|
|
|
|
|
|
Winterchase
Joined: 11 Oct 2011
Posts: 4
Location: Hiawassee Georgia
|
| Posted: Fri Oct 14, 2011 10:07 am Post subject: |
|
|
It's been suggested that I "cut" the ball in half, then use the front half on top, then the model (or subject) and the back half as a third layer in back. It's logical but....
|
|
|
|
|
|
Auieos
Joined: 29 Jan 2010
Posts: 2019
|
| Posted: Sat Oct 15, 2011 6:33 pm Post subject: |
|
|
If it was me i would use a layer mask to place the earth in all the empty spaces, leaving both the front and the back of the ball visible.
Then zoomed in, carefully use a fairly hard brush on the layer mask to make the earth cover the back sections of the ball.
|
|
|
|
|
|
seaco

Joined: 31 Dec 2009
Posts: 729
Location: UK
PS Version: CC
OS: Windows 10
|
| Posted: Mon Oct 17, 2011 1:29 pm Post subject: |
|
|
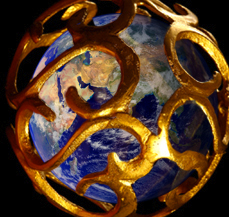
Maybe like this?
| Description: |
|
| Filesize: |
98.99 KB |
| Viewed: |
529 Time(s) |
|
_________________
Lee |
|
|
|
|
|
Winterchase
Joined: 11 Oct 2011
Posts: 4
Location: Hiawassee Georgia
|
| Posted: Mon Oct 17, 2011 1:50 pm Post subject: |
|
|
Outstanding! Now, how did you do it?
I cut out the back part, added about the same picture of Earth, only rotated the ball to make the shadows/light direction match, then deleted the front part of the ball and made it a bottom layer. It was an awful lot of trouble!
|
|
|
|
|
|
seaco
Joined: 31 Dec 2009
Posts: 729
Location: UK
PS Version: CC
OS: Windows 10
|
| Posted: Mon Oct 17, 2011 1:57 pm Post subject: |
|
|
Answer is the easiest way I could, the pic below says it all really!
| Description: |
|
| Filesize: |
30.87 KB |
| Viewed: |
519 Time(s) |

|
_________________
Lee |
|
|
|
|
|
|


