|
|
| Author |
Message |
chrisjefc
Joined: 23 Mar 2011
Posts: 5
|
 Posted: Sun Mar 27, 2011 11:31 am Post subject: photo restoration advice Posted: Sun Mar 27, 2011 11:31 am Post subject: photo restoration advice |
 |
|
hi guys
im very much new to photoshop been messing around with it for just over a week, and i have decided to challange myself to do a project for a present for my mum for mothers day.
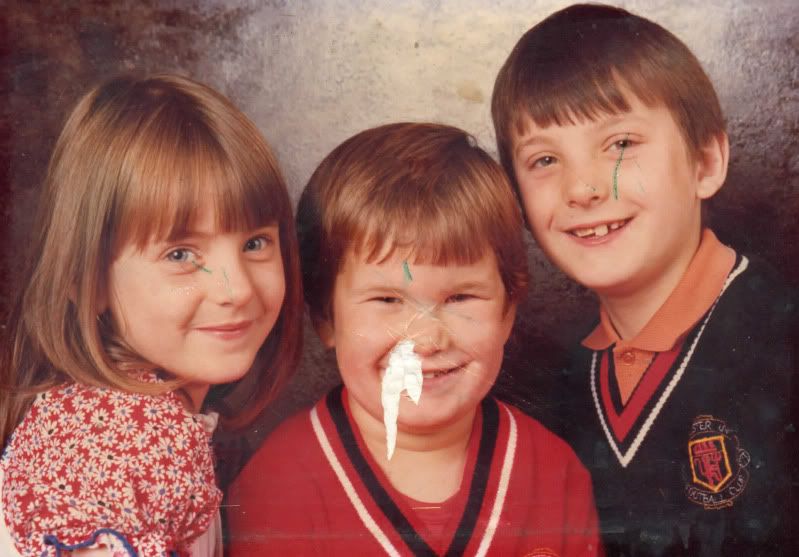
so i got a picture she has that my brother damaged years ago and i set about trying to repair it this is the photo before i started

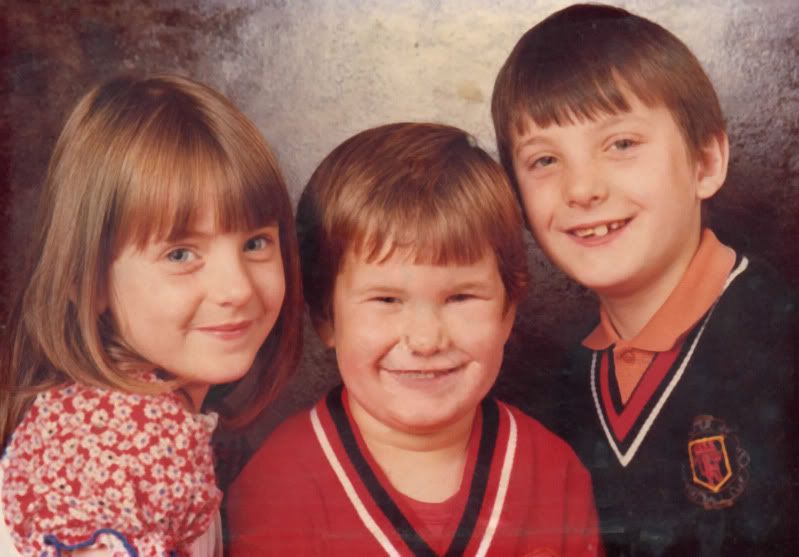
i have done what i think is a pretty good job for a mere novice and not really knowing what im doing. Problem is i have hit a bit of a brick wall
and need some advice on what to do next
this is the photo now

i have managed to remove lots of the crease's and bits but thats not what is concerning me, i still look a bit disfigured in the nose area and the white marks on the bottom of the picture is there an easy way to remove this or is it just with the clone tool?
and whats the best course of action with the nose and possible the mouth aswell
and advice and help would be much welcomed, im not looking for anyone to do the stuff for me as i want to learn as much as possible
please dont slate my work as like i said only opened photoshop up for the first time last week (and that was to make a banner)
p.s my big brother went on to have a brace fitted and now has nice teeath haha
thanks in advance
chris |
|
|
|
|
 |
hawkeye
Joined: 14 May 2009
Posts: 2377
Location: Mesa, Az
OS: Windows 7 Pro 64 bit
|
 Posted: Sun Mar 27, 2011 1:30 pm Post subject: Posted: Sun Mar 27, 2011 1:30 pm Post subject: |
 |
|
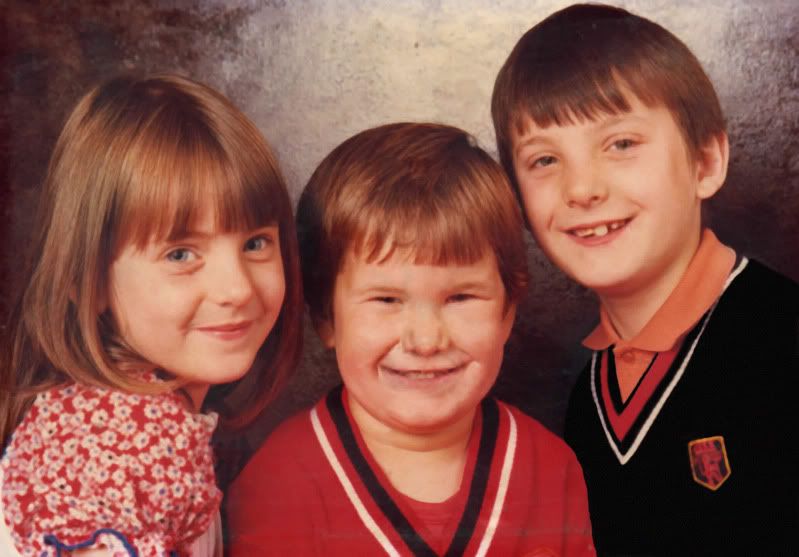
You've got a good start.
For the nose select an area of the right side, copy/paste (ctrl+J) flip horizontal and move it place with the move tool (V). Adjust as necessary contrast and brightness to match and blend the edges with a soft low opacity eraser.
General small area touch-ups. Always use layers. On a blank layer use I used a soft paint brush at low opacity and sampled color (alt+left click) often.
Large sweater area. I selected the area and on a new layer I used a reflected gradient to fill the area. I the added some noise to simulate the sweaters texture. Then erased away the area over the badge.
Curves adjustment to correct the color balance of the picture,and a dd a bit more contrast.
Keep at it you're doing very good so far. |
|
|
|
|
 |
chrisjefc
Joined: 23 Mar 2011
Posts: 5
|
 Posted: Sun Mar 27, 2011 2:04 pm Post subject: Posted: Sun Mar 27, 2011 2:04 pm Post subject: |
 |
|
wow you have done a fanastic job of that, if i can get it half that good i can see my mum having a good cry come mothers day.
you make it sound so easy haha. i will follow your instuctions and post back when i have completed it
thanks for your help
chris |
|
|
|
|
 |
chrisjefc
Joined: 23 Mar 2011
Posts: 5
|
 Posted: Mon Mar 28, 2011 2:55 pm Post subject: Posted: Mon Mar 28, 2011 2:55 pm Post subject: |
 |
|
im stuggling with the gradient tool for this 
i dont understand how to use it  |
|
|
|
|
 |
chrisjefc
Joined: 23 Mar 2011
Posts: 5
|
 Posted: Mon Mar 28, 2011 4:18 pm Post subject: Posted: Mon Mar 28, 2011 4:18 pm Post subject: |
 |
|
ok i managed to finish this to the best i could do
stuggled with the gradient tool and the final contrast and color bit but i guess that will get better
hawkeyes is a miles better finish than mine but for my first go im very happy with my end result
thanks for your help hawkeye
 |
|
|
|
|
 |
thehermit
Joined: 05 Mar 2003
Posts: 3987
Location: Cheltenham, UK
|
 Posted: Mon Mar 28, 2011 5:27 pm Post subject: Posted: Mon Mar 28, 2011 5:27 pm Post subject: |
 |
|
GJ chrisjefc, your mum will love it.
_________________
If life serves you lemons, make lemonade! |
|
|
|
|
 |
K-touch
Joined: 17 Jan 2010
Posts: 166
Location: Sydney, Australia.
PS Version: CS, CS2, CS3, CS4
OS: Mac OS X, Win Xp
|
 Posted: Wed Apr 06, 2011 6:31 am Post subject: Posted: Wed Apr 06, 2011 6:31 am Post subject: |
 |
|
All you got to do is learn how to Clone..
_________________
Add your Business and be part of a new Business Video Directory revolution : )
http://www.kantabiz.com/videos.php |
|
|
|
|
 |
YourOnlySin
Joined: 23 Jan 2011
Posts: 230
|
 Posted: Thu Apr 07, 2011 8:00 pm Post subject: Posted: Thu Apr 07, 2011 8:00 pm Post subject: |
 |
|
|
|
|
|
|
 |
|


