|
|
| Author |
Message |
iverha
Joined: 19 Feb 2011
Posts: 4
|
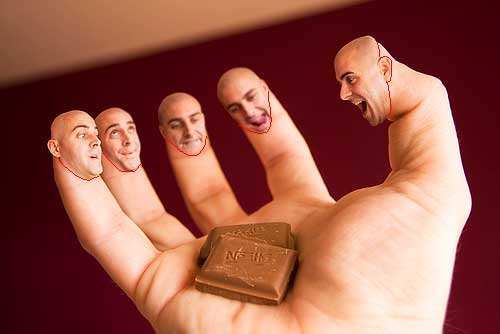
 Posted: Sun Feb 20, 2011 8:36 am Post subject: Help on creating something similiar as this Posted: Sun Feb 20, 2011 8:36 am Post subject: Help on creating something similiar as this |
 |
|
|
|
|
|
|
 |
Auieos
Joined: 29 Jan 2010
Posts: 2019
|
 Posted: Sun Feb 20, 2011 5:56 pm Post subject: Posted: Sun Feb 20, 2011 5:56 pm Post subject: |
 |
|
The picture you provided doesn't match the focus imo.
You would probably be looking at four main things to match the heads to the fingers. They would be Hue, Saturation, Blur and Levels.
With hue you need to match the hand colour
Saturation match how much colour is there.
Blur is matching the focus.
Levels to match the appearance of the highlights and the shadows of the heads to the hand
All of these are found in Edit > Image > Adjustments except for blur which is in the filters menu.
Make sure to use layer mask and paint the heads on to the finger tips, don't try and cut them out and expect them to look attached.
You may need to flatten and smudge around edges of the head you cant get to blend.
Don't be afraid to upload an example of your work, even if you think it looks bad, it wont stay like that for long when you get better.
|
|
|
|
|
 |
iverha
Joined: 19 Feb 2011
Posts: 4
|
 Posted: Tue Feb 22, 2011 8:04 am Post subject: Posted: Tue Feb 22, 2011 8:04 am Post subject: |
 |
|
Thank you for a good answer!
The color I should get about right I guess, but what do I do to make a smooth transition from the neck to the fingers? It is supposed to look like the heads are a part of the fingers, but that's hard.
What tools should I use to manage that?
Could puppet warp be the one, or should I just smudge it?
|
|
|
|
|
 |
thehermit
Joined: 05 Mar 2003
Posts: 3987
Location: Cheltenham, UK
|
 Posted: Tue Feb 22, 2011 8:18 am Post subject: Posted: Tue Feb 22, 2011 8:18 am Post subject: |
 |
|
Layer Masks or Clone and or heal tool. Perhaps judicious use of adjustment layers like Hue/Sat, Match Colour command when importing the images.
_________________
If life serves you lemons, make lemonade! |
|
|
|
|
 |
Auieos
Joined: 29 Jan 2010
Posts: 2019
|
 Posted: Tue Feb 22, 2011 5:36 pm Post subject: Posted: Tue Feb 22, 2011 5:36 pm Post subject: |
 |
|
Like hermit says you should really use layer mask for non destructive editing of the heads onto the fingers. The smooth transition will occur when you use a soft brush and the colours/levels of the two images match.
Tutorial on them...
http://www.lunacore.com/photoshop/tutorials/tut003.htm
Smudge tool will help once your almost there getting the final smooth transition look, remember not to drag it along the line where the face connects to the finger. Instead go back and forth like your polishing the edge from the finger skin into the face skin.
The point at which you attach the head/face varies depending on the angle of the finger and the lines on the face. I have drawn the lines on the image below.
Angles of the head should be within 15 degrees of the finger angle otherwise it will look off.
Looking at the image of the hand in close up i beleive the artist may have used the liquefy filter on the hand to get the skin to appear if it was stretching out to the face fingertips. This should not be necessary however, just additional.
| Description: |
|
| Filesize: |
13.93 KB |
| Viewed: |
749 Time(s) |

|
|
|
|
|
|
 |
iverha
Joined: 19 Feb 2011
Posts: 4
|
 Posted: Tue Feb 22, 2011 6:14 pm Post subject: Posted: Tue Feb 22, 2011 6:14 pm Post subject: |
 |
|
Thank you!
Should I just use a very soft brush on a layer mask?
And then some smudging maybe. I could try liquify, puppet warp seem to work good also.

|
|
|
|
|
 |
Auieos
Joined: 29 Jan 2010
Posts: 2019
|
 Posted: Wed Feb 23, 2011 8:17 pm Post subject: Posted: Wed Feb 23, 2011 8:17 pm Post subject: |
 |
|
Hey no worries,
Yes soft brushes work best with masking in two images that need to be blended.
Also when you get to the edges you can turn down the brush flow.
This will make the gradual transition from head to finger softer because the areas have to be brushed over more than once to achieve total masking.
Smudging yes and I would leave liquefy alone until you have your final result and then decide if it needs it.
|
|
|
|
|
 |
iverha
Joined: 19 Feb 2011
Posts: 4
|
 Posted: Thu Feb 24, 2011 5:47 am Post subject: Posted: Thu Feb 24, 2011 5:47 am Post subject: |
 |
|
Yeaaah, I've managed to make it the way I wanted! 
Thank you for replies!
This I did:
Took pictures of my mate on a green screen background, so the selection was very simple to do.
Converted all the head layers and the hand layer into smart objects, and when I had finished transforming I duplicated them and rasterized the layers, so I had adjustment layers.
The transition from head to finger, worked just perfect with a layer mask and soft brushes with low opacity. Then I used match color (source image:hand) on the adjustment layer to get the color about right. Also some job with levels. Finally I found it to be a good idea to do some work with shadow/highlihts. (Something strange is that you can't use a layer mask on a smart object, so I had to put the layers in a folder and put a layer mask on the folder instead, that worked.)
Just thought I would share how I made it in the end, I can upload the picture if you want to, not quite done yet.
Aaand this wouldn't have worked without you, so thanks alot!  
|
|
|
|
|
 |
YourOnlySin
Joined: 23 Jan 2011
Posts: 230
|
 Posted: Thu Feb 24, 2011 9:49 pm Post subject: Posted: Thu Feb 24, 2011 9:49 pm Post subject: |
 |
|
| iverha wrote: |
(Something strange is that you can't use a layer mask on a smart object, so I had to put the layers in a folder and put a layer mask on the folder instead, that worked.)
|
Glad you were able to figure it out. I'm not sure which version of PS you are using but in CS5, at least, you can apply a layer mask to a smart object, you just cant alter the image with any painting, cloning, etc. unless you duplicate the smart object layer or create a new layer above it. This is, in effect, what you did by grouping. Kudos for figuring that out.
_________________
http://www.jmerrittphotorestoration.com/ |
|
|
|
|
 |
thehermit
Joined: 05 Mar 2003
Posts: 3987
Location: Cheltenham, UK
|
 Posted: Fri Feb 25, 2011 6:34 am Post subject: Posted: Fri Feb 25, 2011 6:34 am Post subject: |
 |
|
I'm sure the folk here will be interested in what you came up with iverha.
_________________
If life serves you lemons, make lemonade! |
|
|
|
|
 |
|


