|
|
| Author |
Message |
mankomsu
Joined: 07 Feb 2011
Posts: 2
Location: DeWitt, MI
|
 Posted: Mon Feb 07, 2011 3:57 pm Post subject: Help - Change the hair color only on the tips Posted: Mon Feb 07, 2011 3:57 pm Post subject: Help - Change the hair color only on the tips |
 |
|
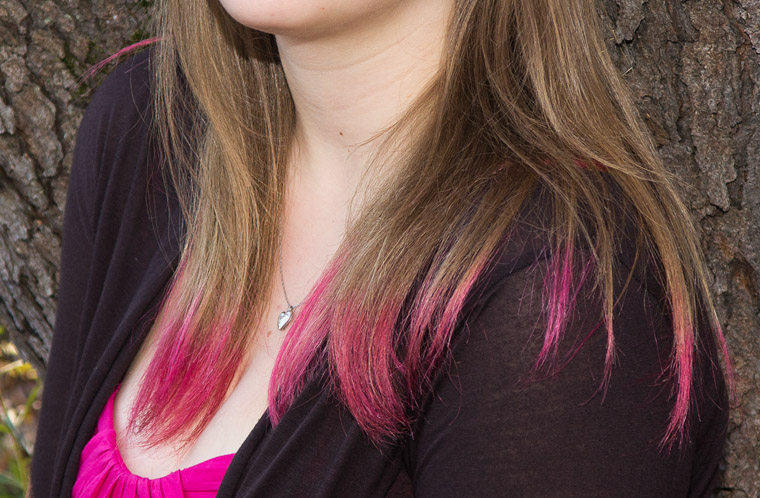
I hoping someone can help me with a problem... i thought it would be pretty easy to do, and I'm still sure it is, but I'm failing miserably!
I have a portrait of a girl who dyed the tips of her hair pink a week before I shot her pictures. I figured i could select the color and change it back to her normal hair color. Only the tips are affected, so I have a lot of shades of brown to work from....
Well, I'm unable to find a way to do this that works!
Can someone PLEASE advise me on how to accomplish this?
Thank you so much in advance!
| Description: |
| I cropped out most of the image but left the hair that needs to be changed. |
|
| Filesize: |
158.3 KB |
| Viewed: |
1026 Time(s) |
|
|
|
|
|
|
 |
Auieos
Joined: 29 Jan 2010
Posts: 2019
|
| Posted: Mon Feb 07, 2011 5:39 pm Post subject: |
|
|
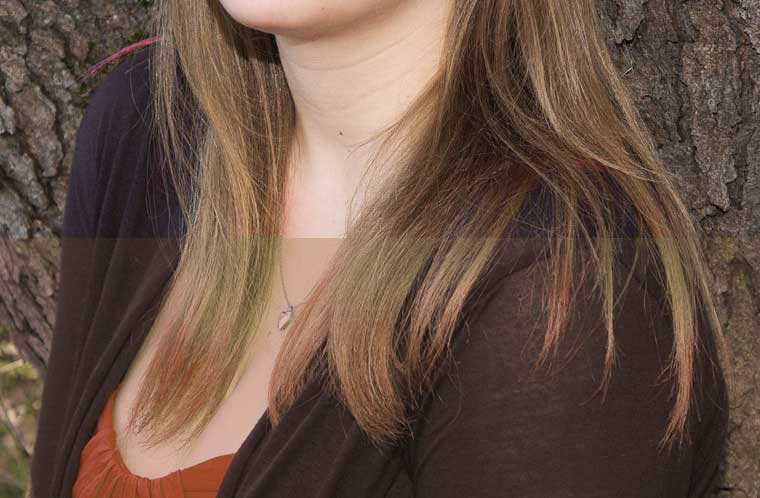
This isn't going to be easy to explain 
Open up your image.
Rectangular marquee the entire area of pink hair, making sure its all in the rectangle.
Now right click the selection and choose layer via copy. (layer A)
Now Rectangular marquee the top right quarter of the image you provided below. So the neck, hair and tree.
Make sure your base layer is still selected and again right click the selection layer via copy. (Layer B)
Now right click the layer B, choose duplicate layer, and when the duplicate layer dialogue comes up, where it says 'destination, document:' choose from the drop down box new.
This will send that layer to a new image as you will see.
Ok go back to your original picture. You can delete layer B from your original image if you wish.
Select layer A and go to 'Image > Adjustments > Match Color'. Now right down the bottom of the match colour dialogue there is a source.
Pick that new image you created with the brown hair, tree etc as the source and press ok.
Done.
You should end up with something like below you can mask in. Also piece i used as colour match source.
| Description: |
|
| Filesize: |
13.52 KB |
| Viewed: |
1016 Time(s) |

|
| Description: |
|
| Filesize: |
45.59 KB |
| Viewed: |
1016 Time(s) |
|
|
|
|
|
|
|
mankomsu
Joined: 07 Feb 2011
Posts: 2
Location: DeWitt, MI
|
| Posted: Tue Feb 08, 2011 12:48 pm Post subject: |
|
|
I want to thank you for your help.... your information provided with a pretty good starting point. I was able to make the changes using your method as well as replacing the color and then fine tuning it all with adjusting the saturation.
I have been stuck on this project for over a month now and your help was MUCH APPRECIATED!
|
|
|
|
|
|
darklite
Joined: 19 Dec 2009
Posts: 277
Location: Oregon, U.S.
PS Version: cs
OS: windows 7
|
| Posted: Tue Feb 08, 2011 3:55 pm Post subject: |
|
|
Don't know if this cuts it or not, but all I did was:
1. duplicate layer
2. Layer>Added fill layer - chose a bright pink color from the color picker.
3. erased out what I didn't want. I used a very large brush 300px at a low pressure of about 30% to gradually soften the ends. I used a tight, small brush at 100% pressure to erase the rest.
I didn't adjust the opacity of the fill layer at all, but that's optional.
| Description: |
|
| Filesize: |
117.57 KB |
| Viewed: |
996 Time(s) |

|
_________________
Jeff
http://www.autumnwindstudios.com |
|
|
|
|
|
Auieos
Joined: 29 Jan 2010
Posts: 2019
|
| Posted: Tue Feb 08, 2011 4:35 pm Post subject: |
|
|
Hey no worries Mankomsu.
|
|
|
|
|
|
seaco

Joined: 31 Dec 2009
Posts: 729
Location: UK
PS Version: CC
OS: Windows 10
|
| Posted: Sun Feb 13, 2011 4:20 pm Post subject: |
|
|
OK here's my way select the pink hair area with the LASSO TOOL the PASTE/COPY to a new layer go to IMAGE/ADJUSTMENTS and choose REPLACE COLOR.
Choose the pink tips then use the FUZZINESS slider to select just the pink, the use the HUE/SATURATION/LIGHTNESS sliders to adjust out the pink and bring back the original colour then OK.
Any small whispsleft can be taken out with SPONGE/DESATURATE...
_________________
Lee |
|
|
|
|
|
seaco
Joined: 31 Dec 2009
Posts: 729
Location: UK
PS Version: CC
OS: Windows 10
|
| Posted: Sun Feb 13, 2011 5:20 pm Post subject: |
|
|
Like this...
| Description: |
|
| Filesize: |
186.46 KB |
| Viewed: |
941 Time(s) |

|
_________________
Lee |
|
|
|
|
|
Auieos
Joined: 29 Jan 2010
Posts: 2019
|
| Posted: Mon Feb 14, 2011 4:31 pm Post subject: |
|
|
Quick 
|
|
|
|
|
|
|


