|
|
| Author |
Message |
richpate
Joined: 23 Nov 2010
Posts: 6
Location: New Mexico
|
 Posted: Tue Nov 23, 2010 8:07 pm Post subject: Best way to change the dark side of an object in an image? Posted: Tue Nov 23, 2010 8:07 pm Post subject: Best way to change the dark side of an object in an image? |
 |
|
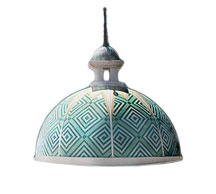
I often want to change the dark shadow side and light highlight side of an object that I place in an image to make it match the lighting of the composite image. An example would be a dome roof on a building.
I often flip the image and/or use a layer in overlay mode filled with 50% gray to paint in the dark side of the object and to paint out the unwanted original dark side. I find this very time consuming and hard to get the lighting to look right. Lighting transitions over a curved surface are hard to do this way.
Anyone have a suggestion of a better technique to do this? Blend modes? Gradients? I'm just guessing. Using CS4 on a Mac. Thanks.
Rich
|
|
|
|
|
 |
hawkeye
Joined: 14 May 2009
Posts: 2377
Location: Mesa, Az
OS: Windows 7 Pro 64 bit
|
| Posted: Wed Nov 24, 2010 10:59 am Post subject: |
|
|
Without seeing an example it's hard to say.
|
|
|
|
|
|
richpate
Joined: 23 Nov 2010
Posts: 6
Location: New Mexico
|
| Posted: Wed Nov 24, 2010 11:32 am Post subject: |
|
|
| hawkeye wrote: | | Without seeing an example it's hard to say. |
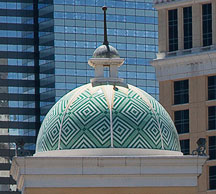
OK, Hawkeye, I hope these two images get posted properly. One is the straight RAW shot (w. background), and the other a poorly done Dodge & Burn with a layer in Overlay Mode filled w. 50% gray (top image).
I want to shift the light source from above the dome to the left side to match the lighting in the composite image it is to be placed in.
Thanks for any suggestions on a better way to do this.
| Description: |
|
| Filesize: |
10.6 KB |
| Viewed: |
566 Time(s) |
|
| Description: |
|
| Filesize: |
20.06 KB |
| Viewed: |
566 Time(s) |
|
|
|
|
|
|
|
hawkeye
Joined: 14 May 2009
Posts: 2377
Location: Mesa, Az
OS: Windows 7 Pro 64 bit
|
| Posted: Wed Nov 24, 2010 1:18 pm Post subject: |
|
|
You might try an adjustment layer and mask...but there are a hundred ways to do things in Photoshop, in this case dodge and burn looks as good as any.
|
|
|
|
|
|
richpate
Joined: 23 Nov 2010
Posts: 6
Location: New Mexico
|
| Posted: Wed Nov 24, 2010 1:26 pm Post subject: |
|
|
Thanks. I have thought about trying to first neutralize the existing shadow with Dodging. Then pull a monochromatic gradient across where I want the shadow to be. Then maybe working with the opacity until I get it right.
I have also thought about trying to paint over the area with a low opacity brush, black for a foreground color and using the Color Mode for the brush. Not sure.
|
|
|
|
|
|
Bostone737
Joined: 28 Nov 2010
Posts: 11
|
| Posted: Mon Nov 29, 2010 9:17 am Post subject: |
|
|
1)duplicate the layer, set blending mode to screen, create layer mask on it, on mask make gradient going from black to neutral, black over the lighter side, shift + drag left to right.
2) duplicate that layer, click the mask on that new layer, ctrl+I to invert it, set blending mode to linear burn. Seems to even it out pretty well
3) create new fill layer with brightness/contrast. copy mask from step 1 layer, set brightness to like 35 or something
skip step 2 for for overall brighter image but in my opinion, looks better overall with doing that too
like hawkeye said, there is probably a ton of ways to do this, probably with 2 less steps than what i did, this is just the way i did it
|
|
|
|
|
|
richpate
Joined: 23 Nov 2010
Posts: 6
Location: New Mexico
|
| Posted: Mon Nov 29, 2010 5:03 pm Post subject: |
|
|
Thanks Bostone.
A couple of questions to clarify:
1. In step 1, is that a gradient going from black to transparency?
2. In step 3, is that an adjustment layer for the Brightness/Contrast or a fill layer as described?
|
|
|
|
|
|
Bostone737
Joined: 28 Nov 2010
Posts: 11
|
| Posted: Mon Nov 29, 2010 11:10 pm Post subject: |
|
|
yes, black to transparency, black will be on the left and transparent on the right
and sorry, it's an adjustment layer via selecting brightness/contrast in the 'yin and yang' looking icon at the bottom of the layers panel or by just selecting brightness/contrast it in the adjustments panel, just make it the top most layer
|
|
|
|
|
|
richpate
Joined: 23 Nov 2010
Posts: 6
Location: New Mexico
|
| Posted: Tue Nov 30, 2010 12:21 pm Post subject: |
|
|
Thanks again.
I had been wondering if gradients were the way to go on these shading exercises. I will experiment further with them. Thanks for giving me a place to start.
Maybe a radial gradient might be possible with a curved surface like the dome example I gave? I've just started to explore the 127 ways to implement gradients and shading in CS5. Lots to learn.
|
|
|
|
|
|
|


