|
|
| Author |
Message |
kwagga
Joined: 01 Aug 2010
Posts: 10
|
 Posted: Mon Aug 02, 2010 1:49 am Post subject: Convert text to bitmap and Rasterize it? Posted: Mon Aug 02, 2010 1:49 am Post subject: Convert text to bitmap and Rasterize it? |
 |
|
Hi Guys,
I'm a newbie with Photoshop, and I'm hoping someone will be so kind as to give me a couple pointers.
I'm busy with the 'neon' text part of this tutorial:
http://www.bonstutoriais.com.br/learn-to-make-a-nice-text-effect-neon
The tutorial isnt very well written (compared to psdtuts), but it's relatively easy to follow, except, the tutorial states "convert your text in bitmap, right above the text layer, and then click Rasterize Layer".
How would this be accomplished, since from what I tried, Mode > Grayscale > Mode > Bitmap, then rasterize, doesn't work.
|
|
|
|
|
 |
kwagga
Joined: 01 Aug 2010
Posts: 10
|
| Posted: Mon Aug 02, 2010 7:06 am Post subject: |
|
|
Nevermind... figured it out... a "shape" is bitmap.
|
|
|
|
|
|
Patrick
Administrator

Joined: 14 Feb 2003
Posts: 11945
Location: Harbinger, NC, U.S.A.
|
| Posted: Tue Aug 03, 2010 2:30 pm Post subject: |
|
|
|
|
|
|
|
|
kwagga
Joined: 01 Aug 2010
Posts: 10
|
| Posted: Tue Aug 03, 2010 2:33 pm Post subject: |
|
|
Hi Patrick, thanks for the welcome!
Listen, who can provide me with clearer details on this tutorial?
bonstutoriais.com.br/learn-to-make-a-nice-text-effect-neon
I would really really really really like to master this neon effect, been at it for a week now.
|
|
|
|
|
|
Auieos
Joined: 29 Jan 2010
Posts: 2019
|
| Posted: Wed Aug 04, 2010 12:56 am Post subject: |
|
|
Yep we can try  which part of the tut isn't working out for you? which part of the tut isn't working out for you?
|
|
|
|
|
|
kwagga
Joined: 01 Aug 2010
Posts: 10
|
| Posted: Wed Aug 04, 2010 1:34 am Post subject: |
|
|
When using the contract tool, the tutorial states that I must contract the text by 50%, this is not possible, since I get "no pixel selected" error. When I contract by say 10%, the font DOES contract, but the sides of the text still bulge, if you know what I mean (see pic), I'm using exactly the same font as the tut. How do I get it that when the text in contracted, that it's all equal?


Thanks for the help, I'm beginning to pull my hair out!
|
|
|
|
|
|
kwagga
Joined: 01 Aug 2010
Posts: 10
|
| Posted: Wed Aug 04, 2010 1:36 am Post subject: |
|
|
Also the forum states that I must "apply a gradient fill", yet I don't know how this guy came to having his text look like this:

|
|
|
|
|
|
Auieos
Joined: 29 Jan 2010
Posts: 2019
|
| Posted: Thu Aug 05, 2010 1:19 am Post subject: |
|
|
Hey no worries, first of all the font problems would all be over come by using a appropriate font to begin with, and fonts are generally a pain to play with.
OK when your using the contract menu you can only choose pixels not percent, so the tutorial is asking you to find your own number of pixels that reduces the text to about 50% width. The number of pixels required to do this will vary depending on the size of your font.
The problem with the 'budge' in the selection comes from the font being manipulated or transformed longer than it is higher. It is contracting in pixels from the edge inwards, hence why the area from the edge of selection to the edge of the font is even all the way around.
In this tutorial it is obviously important to keep the font even and square, with constant thickness, hence why they use the letter C to create an E because the middle of the E would cause a thick spot.
And lastly the gradient fill is create a new layer then drag the Gradient tool across the canvas.
I get the impression your trying to create your own word insted of 'neon' and this is going to be fiddly so good luck
|
|
|
|
|
|
kwagga
Joined: 01 Aug 2010
Posts: 10
|
| Posted: Mon Aug 09, 2010 11:24 am Post subject: |
|
|
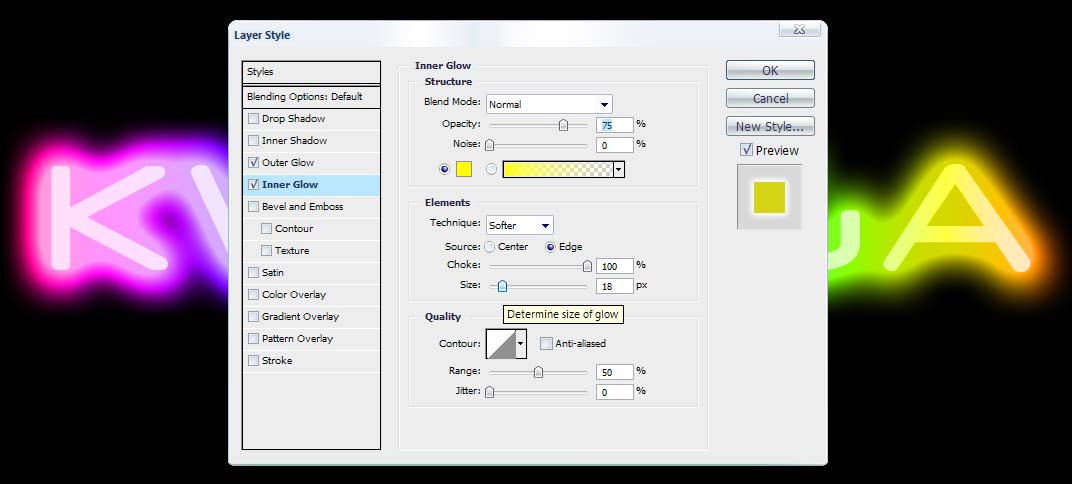
Auieos , I can't thank you enough for your assistance, just reading that it wasn't something I was necessarily doing wrong, made my brain just switch on, and work past the text-technicality. I would however like to call upon your expertise again, just to explain, how do I get the "inner" text which is white in my edit, to also take on a little of the coloured glow, will it come naturally if I just use a thinner font? - AND getting a bit more "outer-glow" - I'm thinking blur will give me the glow I'm looking for, since the outer-glow layer style is already at 100%.
My Edit:

The Image I want:

|
|
|
|
|
|
Auieos
Joined: 29 Jan 2010
Posts: 2019
|
|
|
|
|
|
|