|
|
| Author |
Message |
andrewyeo85
Joined: 06 Feb 2009
Posts: 3
|
 Posted: Fri Feb 06, 2009 11:08 am Post subject: HIgh contrast POrtait Posted: Fri Feb 06, 2009 11:08 am Post subject: HIgh contrast POrtait |
 |
|
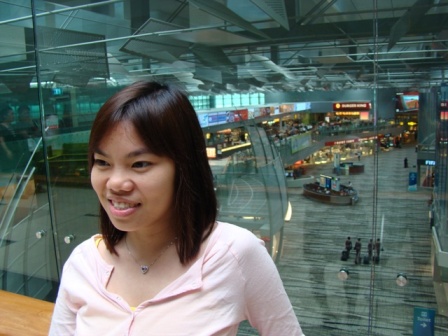
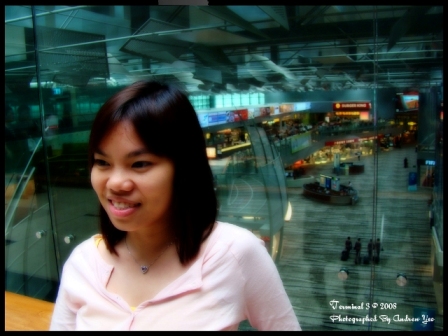
may anyone help me how to do this effect by photoshop from pic1 to pic2...
Thanks
| Description: |
|
| Filesize: |
79.98 KB |
| Viewed: |
606 Time(s) |
|
| Description: |
|
| Filesize: |
114.41 KB |
| Viewed: |
606 Time(s) |
|
|
|
|
|
|
 |
kreativkid

Joined: 17 Jan 2009
Posts: 199
PS Version: CS4
OS: Windows XP
|
| Posted: Fri Feb 06, 2009 11:14 am Post subject: |
|
|
This one's easy, but I'll work up a tutorial anyway...because they're fun to make. 
|
|
|
|
|
|
andrewyeo85
Joined: 06 Feb 2009
Posts: 3
|
| Posted: Sat Feb 07, 2009 9:43 pm Post subject: |
|
|
can provide steps by steps??thanks
|
|
|
|
|
|
Sublimity

Joined: 07 Feb 2009
Posts: 92
Location: Canada
PS Version: Master Collection CS3/CS4
OS: XP SP2/3/Vista
|
| Posted: Sat Feb 07, 2009 11:12 pm Post subject: |
|
|
It looks like a Gaussian layer on soft light blend mode. This effect is used to soften the image and often used to heighten the contrast, especially in bright pictures. Here are the simple steps:
1. Duplicate the layer with the photo. You how have 2 identical layers.
2. On the top layer, right click and click CONVERT FOR SMART FILTERS. You now have a smart object, which is a nondestructive method of editing. Apply a Gaussian blur that is enough to blur out distinctive contours. (FILTER>BLUR>GAUSSIAN BLUR). Don' worry if you applied too much blur because you can always go back and change it (Remember? Smart Object?)
3. Select the "Soft Light" blend mode for the top layer.
4. Adjust the blur to match your tastes. Once done, right click the top layer and select "Rasterize". This will turn your smart object back to a regular layer.
|
|
|
|
|
|
kreativkid
Joined: 17 Jan 2009
Posts: 199
PS Version: CS4
OS: Windows XP
|
| Posted: Sat Feb 07, 2009 11:17 pm Post subject: |
|
|
Ahh! you beat me to it! haha
Those are the exact same steps I have included in my neat little tutorial.
I'm almost finished with it, so I'll just post it anyway.
|
|
|
|
|
|
andrewyeo85
Joined: 06 Feb 2009
Posts: 3
|
| Posted: Mon Feb 09, 2009 8:36 am Post subject: |
|
|
thanks
|
|
|
|
|
|
moondog

Joined: 02 Apr 2008
Posts: 778
Location: Michigan
PS Version: CS2
OS: Vista
|
| Posted: Mon Feb 09, 2009 9:26 am Post subject: |
|
|
|
|
|
|
|
|
Sublimity
Joined: 07 Feb 2009
Posts: 92
Location: Canada
PS Version: Master Collection CS3/CS4
OS: XP SP2/3/Vista
|
| Posted: Mon Feb 09, 2009 3:29 pm Post subject: |
|
|
That looks great moondog. I'm not too fond of adobe's built in HDR merge. I sure hope the plugin allows for full customization of the settings.
|
|
|
|
|
|
moondog
Joined: 02 Apr 2008
Posts: 778
Location: Michigan
PS Version: CS2
OS: Vista
|
| Posted: Mon Feb 09, 2009 3:36 pm Post subject: |
|
|
hey sublimity,
I've only used it twice and haven't really gotten into it, but there are others that swear by it and that page shows some really awesome examples.
If I get more time to play with it, I'll give you an update on it.
dog
_________________
moondog
Romans 10:13
For Whosoever shall call upon the name of the Lord shall be saved |
|
|
|
|
|
kreativkid
Joined: 17 Jan 2009
Posts: 199
PS Version: CS4
OS: Windows XP
|
| Posted: Wed Feb 11, 2009 10:54 am Post subject: |
|
|
|
|
|
|
|
|
|


