|
|
| Author |
Message |
scantechnics
Joined: 01 Dec 2005
Posts: 8
|
 Posted: Thu Dec 15, 2005 4:45 pm Post subject: white background Posted: Thu Dec 15, 2005 4:45 pm Post subject: white background |
 |
|
Hi all
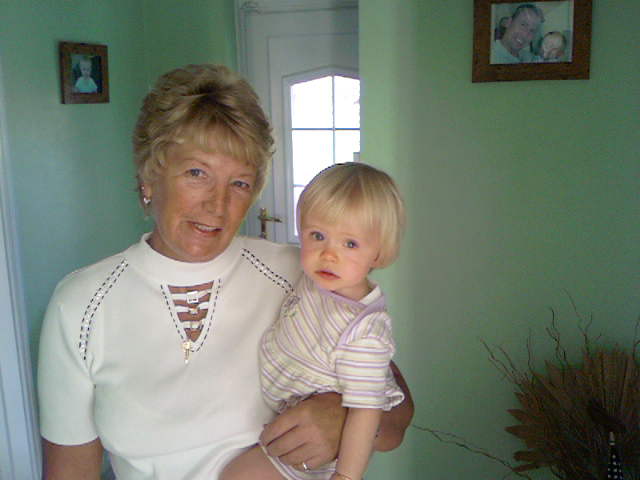
i have a photo of my daughter, with a crap background.
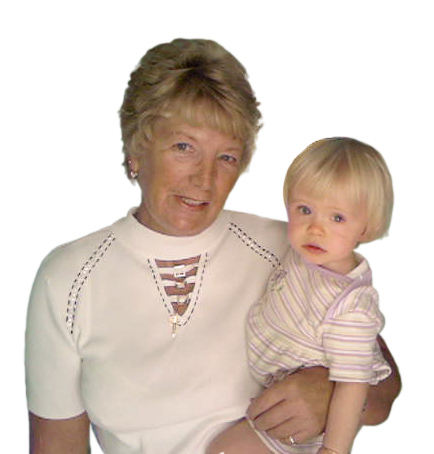
i want to put her in a white background.
I have seen this in some display photos, looks really good.
when i cut around> cut and paste in a new window with a white background the photo doesnt look real to sharp.
do i need to use feathering?
please help
Thankyou so much
David
|
|
|
|
|
 |
lasa

Joined: 08 Aug 2005
Posts: 1090
Location: Florida
PS Version: CS
OS: MS XP
|
 Posted: Thu Dec 15, 2005 9:09 pm Post subject: Posted: Thu Dec 15, 2005 9:09 pm Post subject: |
 |
|
fepends what you are cutting her out with...It actually depends on the picture..can you post it?
Normally once you've made your selection you'd want to feather it 0.3 just to soften the line enough.
Lasa
|
|
|
|
|
 |
scantechnics
Joined: 01 Dec 2005
Posts: 8
|
 Posted: Fri Dec 16, 2005 12:14 pm Post subject: Re: white background updated Posted: Fri Dec 16, 2005 12:14 pm Post subject: Re: white background updated |
 |
|
| scantechnics wrote: | Hi all
i have a photo of my daughter, with a crap background.
i want to put her in a white background.
I have seen this in some display photos, looks really good.
when i cut around> cut and paste in a new window with a white background the photo doesnt look real to sharp.
do i need to use feathering?
picture uploaded
please help
Thankyou so much
David |
| Description: |
|
| Filesize: |
26.5 KB |
| Viewed: |
2310 Time(s) |

|
|
|
|
|
|
 |
lasa

Joined: 08 Aug 2005
Posts: 1090
Location: Florida
PS Version: CS
OS: MS XP
|
 Posted: Sat Dec 17, 2005 7:11 am Post subject: Posted: Sat Dec 17, 2005 7:11 am Post subject: |
 |
|
Duplicate the image (work on a copy layer)
I would use the quick mask with a hard black brush and paint over the image you want to keep..once selected... feather by 0.3... delete.
If you want the hair to look natural use a small smudge tool to give it the wispy blown look.
Good luck hope it helps,
Lasa
| Description: |
|
| Filesize: |
65.94 KB |
| Viewed: |
2290 Time(s) |

|
|
|
|
|
|
 |
scantechnics
Joined: 01 Dec 2005
Posts: 8
|
 Posted: Sat Dec 17, 2005 12:40 pm Post subject: more help white background Posted: Sat Dec 17, 2005 12:40 pm Post subject: more help white background |
 |
|
I think i need more help, can you give me step by step
Thanks
|
|
|
|
|
 |
scantechnics
Joined: 01 Dec 2005
Posts: 8
|
 Posted: Sun Dec 18, 2005 12:00 pm Post subject: Posted: Sun Dec 18, 2005 12:00 pm Post subject: |
 |
|
need more help,
step by step once selected?????? select what?
Thanks
|
|
|
|
|
 |
lasa

Joined: 08 Aug 2005
Posts: 1090
Location: Florida
PS Version: CS
OS: MS XP
|
 Posted: Sun Dec 18, 2005 3:59 pm Post subject: Posted: Sun Dec 18, 2005 3:59 pm Post subject: |
 |
|
When you use the Quick mask it places a red film over everything to paint black... then you press the button beside the Quick mask and it turns the transparent red into a selection... once you have the selection you place it on its own layer.
If this does not help ...look up Quick mask in the PS help.
Lasa
|
|
|
|
|
 |
teddc

Joined: 04 Oct 2004
Posts: 389
Location: Belmont North Australia
|
 Posted: Sun Dec 18, 2005 5:22 pm Post subject: Posted: Sun Dec 18, 2005 5:22 pm Post subject: |
 |
|
Just a historical aside.
The ancient way to create a mask was with 'Rubylith', a type of red thin film that was cut out using a stencil knife and placed over a negative to block out light while exposing the neg. There was also a paint on variety that achieved the same result
ted
_________________
WHAT WOULD VAN GOUGH HAVE DONE WITH PHOTOSHOP |
|
|
|
|
 |
cbadland
Joined: 19 Jan 2005
Posts: 962
|
 Posted: Sun Dec 18, 2005 6:29 pm Post subject: Posted: Sun Dec 18, 2005 6:29 pm Post subject: |
 |
|
Anyone besides me and teddc remember Rubylith? (ancient history).
A lot of PS interface reference things that Photoshop itself has helped to make obsolete.
(I have students now who have no idea what the dodge and burn icons represent!)
|
|
|
|
|
 |
lasa

Joined: 08 Aug 2005
Posts: 1090
Location: Florida
PS Version: CS
OS: MS XP
|
 Posted: Mon Dec 19, 2005 7:34 am Post subject: Posted: Mon Dec 19, 2005 7:34 am Post subject: |
 |
|
Beleive it or not I still have some..around here somewhere!
I even ran across some dry transfer screens shading and matte acetate shading film..they must be kind of crispy...
Lasa
|
|
|
|
|
 |
|


