|
|
| Author |
Message |
johnharlin
Joined: 06 Feb 2005
Posts: 12
|
 Posted: Sun Feb 06, 2005 11:37 pm Post subject: How to fix photo with missing part to make it look natural Posted: Sun Feb 06, 2005 11:37 pm Post subject: How to fix photo with missing part to make it look natural |
 |
|
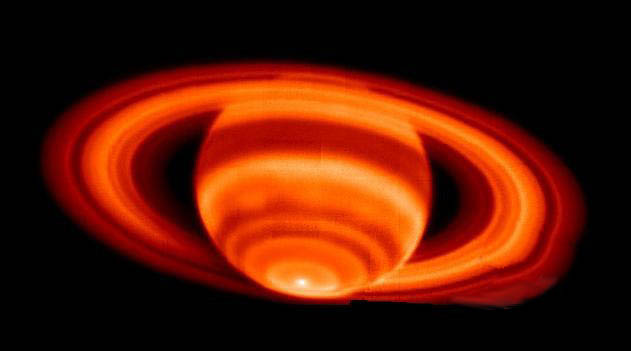
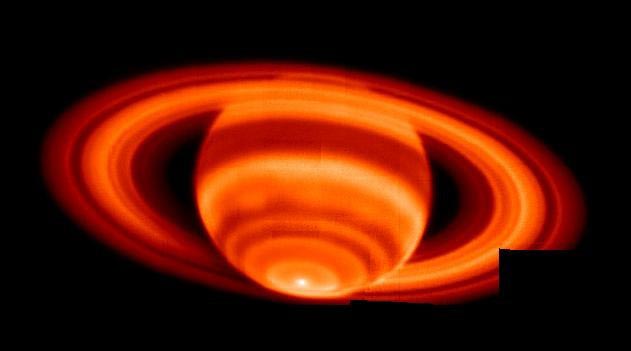
Hi, everyone. I am a beginner using Photoshop 5.5 on Windows 2000. I took a photo off the Net that had a part missing and made it complete but it took me 3 hours to get it right and it is not perfect.
I would be interested if someone can explain the best and fastest way of doing this. The way I did it was that I copied a portion of the photo and then pasted it into the missing part. Then I used the Free Form Rotation and Distort functions to fit it in. Finally I used the smudge tool to smudge the outside edge. It's not great and it took way too long. Just curious if there is another way that you would do this. The photo is of Saturn in infrared and it has a part in the lower right hand corner missing. How would you complete it?
I uploaded the original and photo I fixed but don't know if this will work since it is my first time.
| Description: |
|
| Filesize: |
25.13 KB |
| Viewed: |
628 Time(s) |
|
| Description: |
|
| Filesize: |
14.58 KB |
| Viewed: |
628 Time(s) |
|
|
|
|
|
|
 |
nkollias

Joined: 12 Jan 2005
Posts: 3
Location: GREECE
|
 Posted: Mon Feb 07, 2005 7:57 am Post subject: Posted: Mon Feb 07, 2005 7:57 am Post subject: |
 |
|
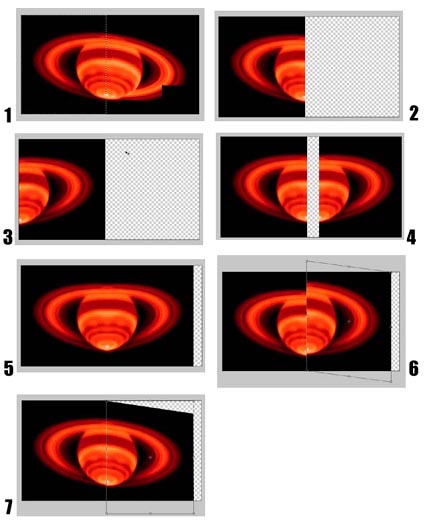
1. Select the half pic
2. Press Cmnd(Ctrl)+J to make new layer with this selection
3. Edit-->Transform-->Flip Horizontal
4. + 5. Connect the two layers
6. Edit-->Transform-->Skew (with Alt button pressed) Skew the pic
7. Cmnd (Ctrl)+T --> Fix the size ...and place it next to the first layer
| Description: |
|
| Filesize: |
41.6 KB |
| Viewed: |
617 Time(s) |
|
|
|
|
|
|
 |
nkollias

Joined: 12 Jan 2005
Posts: 3
Location: GREECE
|
 Posted: Mon Feb 07, 2005 7:58 am Post subject: Posted: Mon Feb 07, 2005 7:58 am Post subject: |
 |
|
Flatten Image and you'll get this...
| Description: |
|
| Filesize: |
13.96 KB |
| Viewed: |
615 Time(s) |

|
|
|
|
|
|
 |
johnharlin
Joined: 06 Feb 2005
Posts: 12
|
 Posted: Mon Feb 07, 2005 5:37 pm Post subject: Nice job and thanks Posted: Mon Feb 07, 2005 5:37 pm Post subject: Nice job and thanks |
 |
|
NICE job and much easier to do. Thanks.
|
|
|
|
|
 |
cbadland
Joined: 19 Jan 2005
Posts: 962
|
 Posted: Tue Feb 08, 2005 9:33 am Post subject: Posted: Tue Feb 08, 2005 9:33 am Post subject: |
 |
|
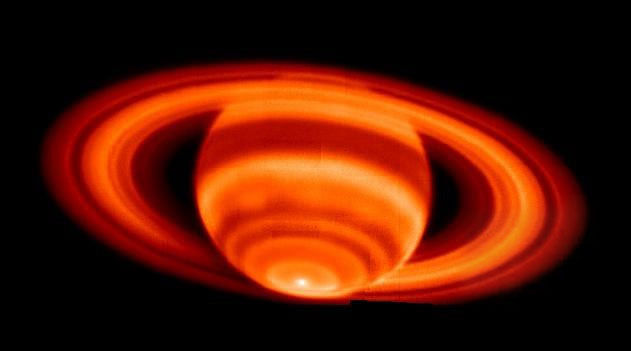
Hmm…
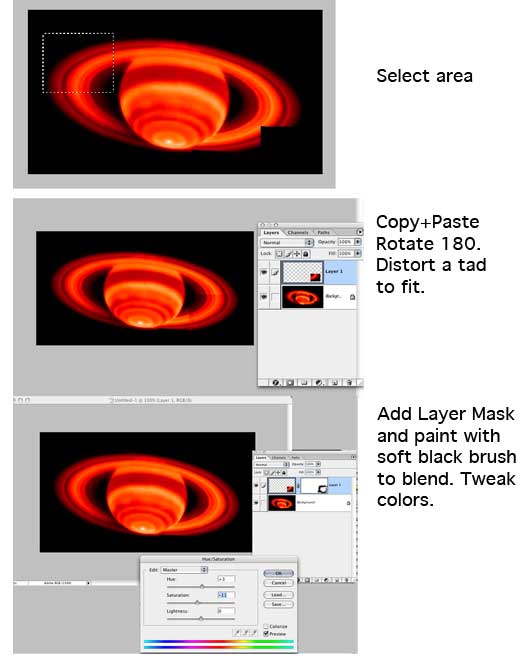
I’d select and copy the upper left section of the ring then rotate and adjust to fit into blank area. Use a layer mask to soften edges and help blend in. Then tweak with levels and Hue/Saturation. This way, I think, is a little easier plus you don’t see the “mirror image” symmetry.
| Description: |
|
| Filesize: |
21.04 KB |
| Viewed: |
576 Time(s) |
|
| Description: |
|
| Filesize: |
31.18 KB |
| Viewed: |
576 Time(s) |
|
|
|
|
|
|
 |
|


